
At our last craft fair at church one of the ladies made Quillows, a quilt that folds up and fits into a pocket to become a decorative pillow. So I thought, why not make a lapghan with the same concept.
If you would like to make a more masculine pillow, check out this post.
Materials:
- Loops and Threads Impeccable--Soft Fern, 3 skeins
- Bernat Softee Chunky Twists yarn--Tropic Twist--1 skein
- Red Heart Soft--Turquesa
- J Hook
- Tapestry needle
Gauge:
1 9 tr shell = 3", 6 dcs = 2", 3 dc rows = 2"
Measurements:
Pillow top without edging measures 12"x12"
Lapghan measures 45"x30" with 3 balls of impeccable, one ball of impeccable adds 10 " in height.
Special Stitches:
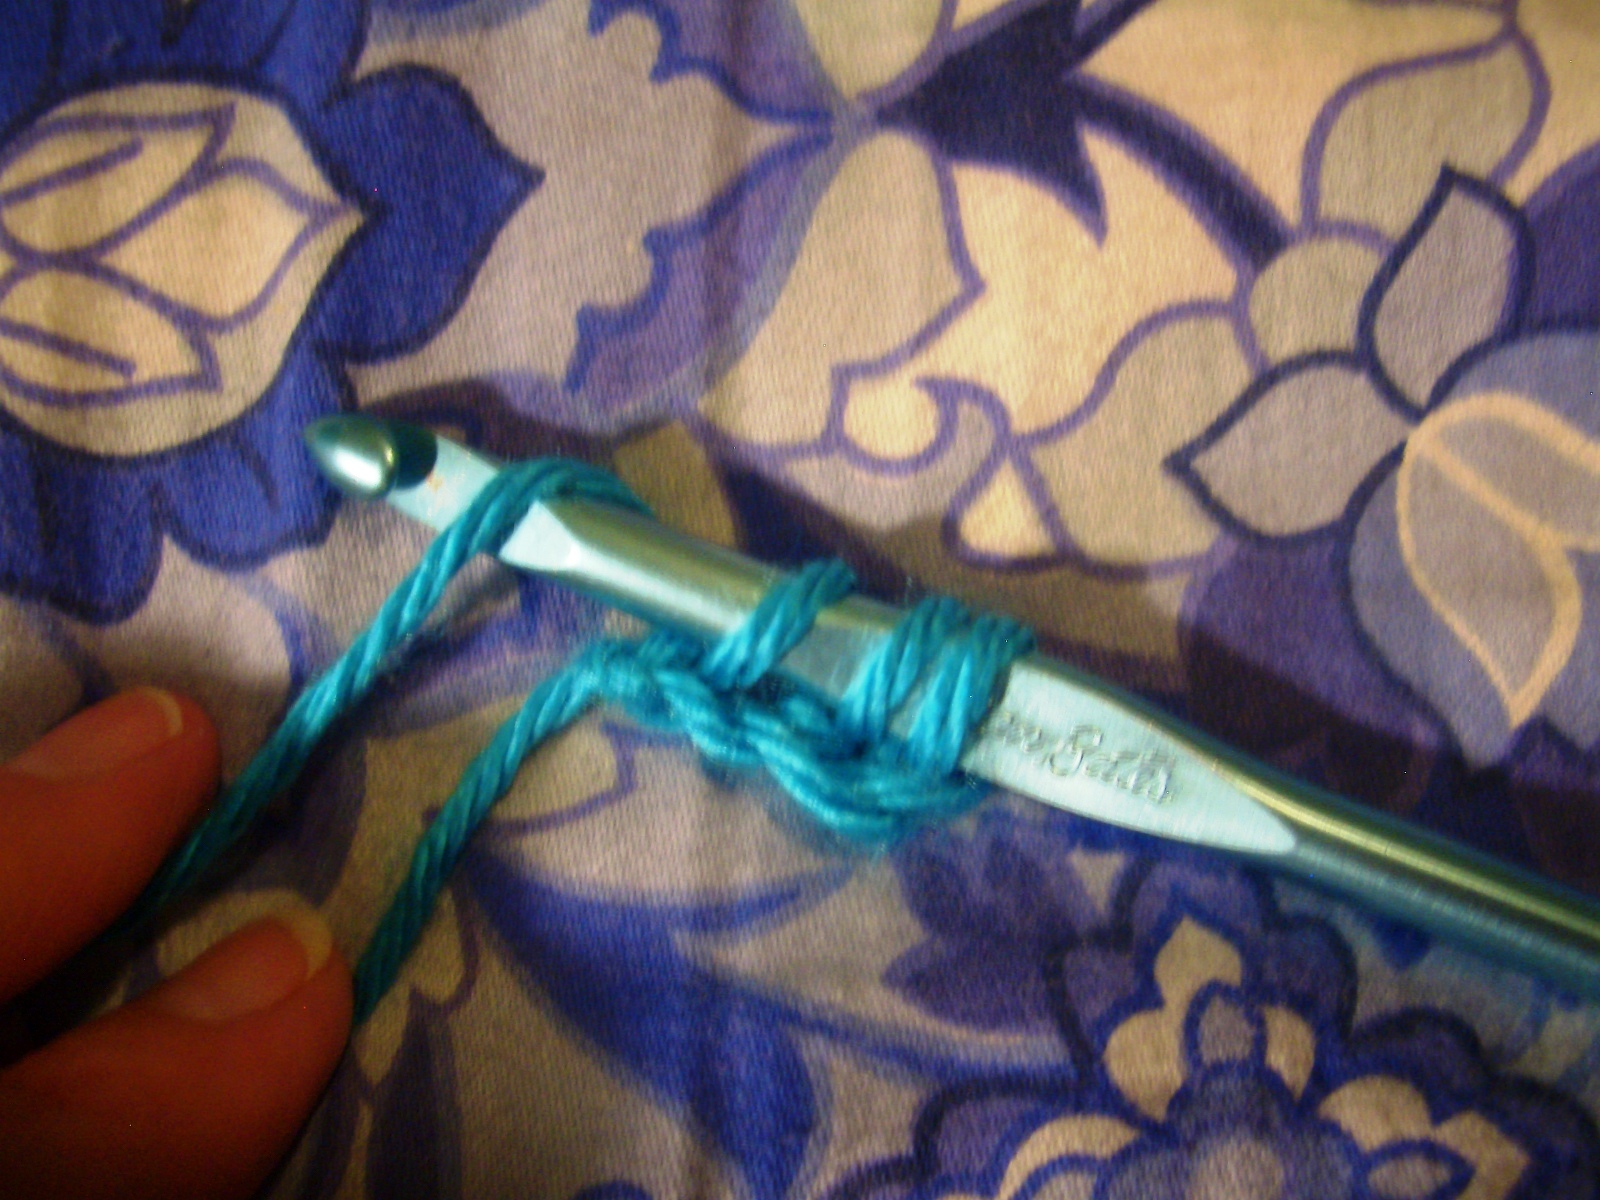
tr--triple or treble stitch--Yarn over (YO) hook 2 times, insert hook into stitch (st), YO, pull up a loop, 4 loops on hook. *YO, pull through 2 loops* 3 times.
 |
| YO 2 times |
 |
| Insert hook in st, YO |
 |
| Pull up a loop, 4 loops on hook |
 |
| YO |
 |
| pull through 2 loops |
 |
| YO |
 |
| Pull through 2 loops again |
 |
| YO |
 |
| pull through last 2 loops |

fdc--foundation double crochet--chain(ch) 3, YO, insert hook in beginning ch, pull up a loop, 3 loops on hook. YO, pull through first loop on hook, YO, pull through two loops, YO, pull through 2 loops. Next st, YO, insert hook in bottom of fdc, YO, pull through first loop on hook, YO, pull through 2 loops, YO, pull through 2 loops.
Fdc has one extra step that a regular dc doesn't have. That extra step is in red. Also, instead of inserting the hook in the next chain (ch) of the foundation ch
you insert it in the bottom of the last fdc.
 |
| Ch 3 |
 |
| YO |
 |
| Insert hook in first ch |
 |
| YO |
 |
| pull up a loop |
 |
| Three loops on hook |
 |
| YO |
 |
| YO, pull through last 2 loops |
 |
| first fdc made |
 |
| YO |
 |
| Insert hook in loop at bottom of first fdc |

Pull up a loop, 3 loops on the hook
 |
| YO, pull through 1 loop |
 |
| Now you do the rest like a regular dc, YO, pull through 2 loops |
 |
| 2 loops left on hook, YO pull through last 2 loops |
 |
| 2 fdcs made |
 |
Abbreviations:
fdc--foundation double crochet dc--double crochet
ch--chain sc(s)--single crochet(s)
tr(s)--triple or treble crochet(s) sk--skip
* *--repeat instructions in between asterisks
Lapghan:
With Impeccable Soft Fern ch 3, fdc 120 times
Row 2: Ch 3 (counts as first dc), dc in next st and in each across. Turn. (120 sts)
Row 3: Ch 3 (counts as first dc), dc in next st and in each st across, including the top of the turning ch. Turn. (120 sts)
Repeat row 3 until blanket measures 45" in width and 30" in height. (If you would like to make a bigger blanket you can use a 4th skein of Impeccable Soft Fern, it will add about 40" in height. This will make your pillow fatter.
If you don't feel comfortable doing the fdc you can
ch 122,
Row 1: dc in 4th ch and in each across. Turn (120 sts)
Then repeat the pattern from Row 3.
Pillow Top
There is a stitch diagram at the end of this pattern for the Pillow Top.
With Bernat Tropic Twist ch 32.
Row 1: sc in second ch from hook, *ch 4 sk 3 chs, sc in next 3 chs, ch 4, sk 3 chs, sc in next ch* repeat to end of ch, you should end with one sc. Turn.

Row 2: ch 1, sc in sc, ch 2, sc in ch-4 sp, *ch 4, sc in middle sc of 3 scs, ch 4, sc in ch-4 sp, ch 3, sc in next ch-4 sp* 2 times, ch 4, sc in middle sc, ch 2, sc in last sc. Turn.

Row 3: ch 4, do 4 trs in ch-2 sp, *sc in ch-4 sp, ch 4, sc in next ch-4 sp, do 9 trs in next ch-3 sp, * 2 times, sc in next ch-4 sp, ch 4, sc in next ch-4 sp, do 5 trs in next ch-2 sp. Turn.

Row 4: Ch 1, sc in top of first two trs, ch 4, *sc in next ch-4 sp, ch 4, sc in 4th tr and next 2 trs, ch 4* 2 times, sc in next ch-4 sp, ch 4, sc in 4th tr and in top of turning ch. Turn.

Row 5: Ch 1, sc in first sc, ch 4, sc in ch-4 sp, *ch 3, sc in next ch-4 sp, ch 4, sc in middle sc of 3 scs, ch 4, sc in next ch-4 sp* 2 times, ch 3, sc in next ch-4 sp, ch 4, sc in last sc. Turn.

Row 6: Ch 1, sc in sc, ch 2, *sc in ch-4 sp, do 9 trs in next ch-3 sp, sc in next ch-4 sp, ch 4* 2 times, sc in next ch-4 sp, do 9 trs in next ch-3 sp, sc in next ch-4 sp, ch 2, sc in sc. Turn.

Row 7: Ch 1, sc in sc, *ch 4, sc in 4th tr and in next 2 trs, ch 4, sc in next ch-4 sp* 2 times, ch 4, sc in 4th tr and in next 2, ch 4, sc in last sc. Turn.

Rows 8 to 12: Repeat Rows 2 to 7.
Rows 13 to 15: Repeat Rows 2 to 4. Fasten off and weave in ends.
Here's a diagram of how to do the rows for the pillow top.

How to Read a Diagram
- Each symbol represents a stitch. On the diagram above I have drawn a symbol and given the written name of the stitch. The pattern at the bottom with the foundation chain that is represented by the ovals.
- The first row (1) starts on the right. The oval next to the 1 is actually part of the foundation chain you just made, because in the patterns it says to do the first single crochet (represented by a cross) in the second chain from the hook. Follow the pattern to the end of the foundation chain.
- For the second (2) row you read the diagram from right to left, however you will still turn your work and be crocheting from right to left (opposite for lefties). The oval after the 2 is the chain 1, then you single crochet in the top of the single crochet on the opposite row.
- Row 3 is read in the same direction as Row 1 (as well as the other odd numbered rows). The tall line with bar on top and the 2 bars through it is the triple or treble crochet symbol. Since you are making shells with the trs in this pattern they are shown attached together (somewhat the way they look once they are crocheted.)
- All even numbered rows are read left to right. I tried to make them a different color so they would stand out better, unfortunately it's a little hard to tell.
- I find that it helps sometimes to read the pattern and then look at the diagram to help me understand the written instructions better.
Shell Edging
With Red Heart Soft Turquesa Bottom: Insert hook in the bottom right corner(foundation ch) of the pillow top.
Ch 3, do 2 dcs in same st, *sc in middle of ch-4 sp, dc 6 times in second sc, sc in middle of next ch-4 sp, dc 6 times in next sc* 2 times, sc in middle of ch-4 sp, dc 6 times in second sc, sc in middle of ch-4 sp, dc 6 times in corner ch.

First Side: Sc in the side of the next sc, dc 6 times in the top of the post of the next tr, sc in the side of the middle sc, dc 6 times in the bottom of the next tr, sc in the top of the same tr, dc 6 times in the second sc, sc in the bottom of the next tr, dc 6 times in the top of the same tr, sc in the first sc, dc 6 times in the 3rd sc, sc in the middle of the last tr, dc 6 times in the corner.

Top: *Sc in middle of ch-4 sp, dc 6 times in next sc, sc in next ch-4 sp, dc 6 times in middle sc* 2 times, sc in middle of next ch-4 sp, dc 6 times in sc, sc in next ch-4 sp, dc 6 times in corner.
Second Side: Sc in the middle of the next tr, dc 6 times in side of next sc, sc in the third sc, dc 6 times in the middle of the next tr, sc in the first sc, dc 6 times in the third sc, sc in the bottom of the middle of the next tr, dc 6 times in the first sc, sc in the third sc, dc 6 times in the middle of the last tr, sc in last sc, dc 3 times in the beginning corner, sl st in top of beginning ch 3 fasten off.
You should end up with 5 shells on each side and 4 corner shells.

Assembly


Pin the pillow top with the shell side down onto the left bottom corner of the blanket.

Using yarn and a tapestry needle, sew the pillow top to the edges of the blanket on three sides (left, right and bottom). Don't tie a knot in the blue yarn, leave a long tail for weaving in, just as you would if you were crocheting. Try not to catch the blue shells in the sewing. Weave in ends.


Here's how to fold up the blanket to turn it into a pillow.


Happy Hooking!
You May Also Like:
 |
| One Skein Scarf |
 |
| Pineapple Wedding Veil |
 |
| Turbanesque Headband |
beautiful pattern and technique.... Thanks for sharing
ReplyDeleteIs the pillow top attach to back or front of the blanket?
DeleteHello!! I'm a mexican girl and i love crochet, your desings it's beautiful, thanks so much and I will keep coming (sorry my english I use google traductor :S) Kisses God Bless
ReplyDeleteYo hablo un poquito de espanol, si me quiere escribir en espanol. Mi esposo es Mexicano.
DeleteThank you for sharing your patterns. You did an excellant job with the instructions and diagrams. Great projects.
ReplyDeleteThanks, I'm a visual learner and I like to have pictures. I think it helps to know where you are.
Deletemolto bello il pattern .... grazie!
ReplyDeletePrego
DeleteHi, Pam!
ReplyDeleteThanks so much for your WONDERFUL pattern. I'm making one for each of my Daughters-in-law. Can you give me some suggestions on how to create a more masculine cover for my sons?
Cynthia "Cynchet" Johnson
I'll see what I can come up with and post it on the blog.
DeleteLOVE this Pattern. One tiny suggestion. It would be much easier to see your stitches if the fabric underneath was a solid. I had a hard time seeing the stitches with the colored fabric and the multicolored yarn.
ReplyDeleteThanks for the pattern!
ty so much!!1 i will be making this for myself!!
ReplyDeleteI'm glad you like it!
DeleteAwesome idea! I make a lot of crochet projects for craft fairs and such. Would you mind if I used this pattern in the future?
ReplyDeleteckstitchcraft@gmail.com
Go right ahead. All I ask is if you post any pictures online that you add a link to my pattern.
DeleteI really like this. Gonna do it!
ReplyDeletePam, this is a great idea. Would be good for taking to "the game" -- sit on the pillow on the bleacher seats, and if it gets cool later in the evening, yay, an afghan is handy!
ReplyDeleteGood explanation about reading symbol charts! Perhaps there's a wee error in this: "For the second (2) row you read the diagram from right to left, however you will still turn your work and be crocheting from right to left (opposite for lefties)."
Later you instruct that all even rows are read left to right. Just thought I'd get you to check on that first sentence, to avoid confusion for folks who haven't used symbol charts before.
This is so cool, and what a pretty pattern! really lovely, and such a good job with the detailed tutorial!!!
ReplyDeleteLove this! How can I adjust this to fit a twin bed? I'm horrible in adjusting patterns.
ReplyDeleteA twin bed measures 80 inches x 37 inches. So first just make your double crochet blanket that size by making your beginning row of fdcs 80 inches long and then doing rows of dcs until its about 37 inches high. You may be able to get by with the original shell top, because it stretches. You could also try using a hook that is 2 sizes larger to make it bigger. Otherwise I would add an extra shell to each row of shells, you would also have to add extra chs on each row of chs.
DeleteShirley Crabtree:
ReplyDeleteThe best instructions I have ever seen! Than you so much for including photos. I know that was extra work for you, but the photos really make a difference. I will make these for my four grand daughters.
I'm glad you like it, I know how frustrated I get when I can't understand written instructions, I always want pictures.
DeleteDo you have a version of this pattern with the chart and one or two photos that I can print to take with me, but not all the "how To" photos. This version will eat up reams of paper and use lots and lots of ink. Thanks, Jeri
ReplyDeleteI have a file for you, but I need your email address so I can send it to you.
DeletePam, This is a very clever and useful pattern.
ReplyDeleteI would love a copy of the file.
Can you send it to astconsultants@iinet.net.au please?
Robyn
I've had this bookmarked for quite a while because I think it's awesome. I can't wait to make one! :)
ReplyDeleteThis comment has been removed by the author.
ReplyDeleteHi, love your patterns, just wondering get if there is a PDF for the Shell Pattern Pillowghan. Thank you
ReplyDeleteHi there, I realise it has been a long time ago you put this pattern up but I'm only now making this lovely pillowghan.
ReplyDeleteHowever I can't believe that no one picked up on the mistakes in this pattern. I don't want to be picky or put the pattern down but just being busy with the edge finding out another mistake. It says to repeat rows 2 to 7 and then rows 2 to 4. I did that and that gives you only 5 shell patterns instead of the 7 in the picture, meaning the sides are not as long as the width.......no square but a rectangle.
I corrected the mistakes in the rows myself but if and when you go over it you'll find there are a few mistakes in the end of the some rows.
I love the pattern but find it a bit disappointing now that I'm almost finished to find out it's not long enough, and I may not have enough yarn to finish it properly 😕
I've done a similar pattern, but I put the Pillow top in the middle. By doing so, while using the afghan, if your feet get cold, put them in the pillow section. Works for me. Love your pattern, though.
ReplyDeleteLovely little pillow. I just wish that I’ve read the comments before finishing it...with just the five rows of shells, the blanket doesn’t quite fit. I’ll just have to use the adjustment with my next one, because I think your pattern is so cute. Thank you so much for sharing!!
ReplyDeleteI just edited the pattern to make it clearer that there are more rows past row 7. Hopefully that will help people in the future.
DeleteI'm just seeing this and I think this is a great idea!!! Thanks for the pattern.
ReplyDeleteso nice pillow
ReplyDeleteblue shell pillow