
Novice Sandy on Knitting Paradise found this absolutely adorable pattern for an
Amigurumi Yorkie. The only problem is the pattern is incomprehensible. I think it was originally written in Japanese and the translation is really bad. Fortunately, I have crocheted some amigurumi patterns using the Japanese chart method so I get what's going on here, so here is my translation. I did have to change a few things here and there, but I think it's pretty true to the original pattern.
Finished Size:
About 7 inches High x 5 inches Wide
Materials:
- Red Heart Super Saver Yarn, worsted weight, Warm Brown
- C or size 2 Hook, such as Clover Soft Touch 2.75-mm Crochet Hooks, Size C
- Stitch Marker
- Poly-fil Stuffing, such as Fairfield Poly-Fil Premium Polyester Fiber
- Embroidery Floss in light browns, beiges, dark yellows and black, such as DMC Prism Six-Strand Floss
- Red Heart Shimmer yarn , Black
- Lion Brand, Vanna's Glamour yarn , Topaz
- 2 round black shank buttons, such as Slimline Buttons Series 1-Black Shank 3/4"
- Tapestry Needle, such as Clover Gold Eye Tapestry, No. 18-22
Rnd--round ch(s)--chain(s) sc(s) single crochet(s) st(s)--stitch(es)
sc2tog--single crochet 2 stitches together
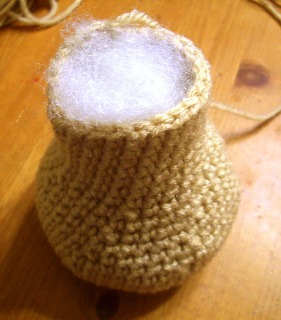
Head
Start with a magic circle
Rnd 1: Ch 1, 6 scs in circle (6scs)
From now on put a stitch marker in the first sc of each rnd.

Rnd 2: 2 scs in each sc (12 scs)
Rnd 3: 1 sc in sc, 2 scs in next sc (18 scs)
Rnd 4: 1 sc in next 2 scs, 2 scs in next sc (24 scs)
Rnd 5: 1 sc in next 3 scs, 2 scs in next sc (30 scs)
Rnd 6: 1 sc in next 4 scs, 2 scs in next sc (36 scs)
Rnd 7: 1 sc in next 5 scs, 2 scs in next sc (42 scs)
Rnd 8: 1 sc in each sc (42 scs)
Rnd 9: 1 sc in next 6 scs, 2 scs in next sc (48 scs)
Rnd 10-11: 1 sc in each sc (48 scs)
Now you start to decrease, continue putting stitch marker in first st of each rnd.
Rnd 12: 1 sc in next 5 scs, sc2tog in next sc (42 scs)
Rnd 13: 1 sc in each sc (42 scs)
Rnd 14: 1 sc in next 4 scs, sc2tog in next sc (36 scs)
Rnd 15: 1 sc in next 3 scs, sc2tog in next sc (30 scs)
Rnd 16: 1 sc in next 2 scs, sc2tog in next sc (24 scs)
Rnd 17-18: 1 sc in each sc (24 scs)
Start stuffing, but stuff loosely enough so you can shape the head.

Rnd 19: 1 sc in next sc, sc2tog (12 scs)
Rnd 20: 6 sc2togs, (6 scs)
Fasten off. Leave bottom open for sewing later. Shape head into an oval.

Body:
Start with a magic circle
Rnd 1: ch 1, 6 scs in circle (6 scs)
Rnd 2: 2 scs in each sc (12 scs)
Rnd 3: 1 sc in next sc, 2 scs in next sc (18 scs)
Rnd 4: 1 sc in next 2 scs, 2 scs in next sc (24 scs)
Rnd 5: 1 sc in next 3 scs, 2 scs in next sc (30 scs)
Rnd 6: 1 sc in next 4 scs, 2 scs in next sc (36 scs)
Rnd 7: 1 sc in each sc (36 scs)
Rnd 8: 1 sc in next 5 scs, 2 scs in next sc (42 scs)
Rnd 9: 1 sc in next 6 scs, 2 scs in next scs (48 scs)
Rnd 10-11: 1 sc in each sc (48 scs)
Start to decrease
Rnd 12: 1 sc in next 6 scs, sc2tog (42 scs)
Rnd 13: 1 sc in each sc (42 scs)
Rnd 14: 1 sc in next 5 scs, sc2tog (36 scs)
Rnd 15: 1 sc in each sc (36 scs)
Rnd 16: 1 sc in next 4 scs, sc2tog (30 scs)
Rnd 17: 1 scs in each sc (30 scs)
Rnd 18: 1 sc in next 3 scs, sc2tog (24 scs)
Rnd 19-26: 1 sc in each sc (24 scs)
Fasten off leaving a long tail for sewing later.
Stuff, but don't sew up the hole.
Front Legs:
Make 2
Make a magic circle
Rnd 1: ch 1, 6 scs in circle (6 scs)
Place a stitch marker in the first st of each rnd
Rnd 2: 2 scs per sc (12 scs)
Rnd 3: 1 sc in next sc, 2 scs in next sc (18 scs)
Rnd 4-5: 1 sc in each sc (18 scs)
Start decreasing
Rnd 6: 1 sc in next sc, sc2tog (12 scs)
Stuff foot.

Rnd 7: sc2tog, 1 sc in next 4 scs, sc2tog, 1 sc in next 4 scs (10 scs)
Rnd 8-22: 1 sc in each sc (10 scs)
Fasten off leaving a long tail for sewing in, stuff the leg near the foot, but not at the top.

Make 2
Make a magic circle
Rnd 1: ch 1, 8 scs in circle (8 scs)
Put a stitch marker in the first st of each row.
Rnd 2: 2 scs in each sc (16 scs)
Rnd 3: 1 sc in next sc, 2 scs in next sc (24 scs)
Rnd 4-5: 1 sc in each sc (24 scs)
Rnd 6: 1 sc in next sc, sc2tog (16 scs)
Rnd 7: sc2tog 3 times, sc in rest of scs (13 scs)
Rnd 8: sc2tog once, 1 sc in sc in rest of sts (12 scs)
Flatten right side on one leg and left side on the other leg. Partially stuff.
Rnd 9-13: 1 sc in each sc (12 scs)

Start stuffing the leg as you finish up.
Rnd 14: sc2tog, 1 sc in next sc (6 scs)
Rnd 15: sc2tog all the way around to close (3 scs)
Fasten off leaving a long tail for sewing.


Ears:
Make 2
Make a magic circle
Rnd 1: ch 1, 4 scs in circle (4 scs)
Put a stitch marker in the first st of each row.
Rnd 2: 1 sc per sc (4 scs)
Rnd 3: 2 scs per sc (8 scs)
Rnd 4: 1 sc per sc (8 scs)
Rnd 5: 1 sc in next sc, 2 scs in next sc (12 scs)
Rnd 6: 1 sc in each sc (12 scs)
Rnd 7: 2 scs in first sc, 1 sc in rest of scs (13 scs)
Rnd 8-10: 1 sc in each sc (13 scs)
Fasten off leaving a long tail for sewing later. Fold ear, don't stuff.


Make a magic circle
Rnd 1: ch 1, 5 scs in magic circle (5 scs)
Put a stitch marker in the first st of each row.
Rnd 2: 1 sc in each sc (5 scs)
Rnd 3: 2 scs in first sc, 1 sc in next, 2 scs in next sc, 1 sc in next 2 scs (7 scs)
Rnd 4-7: 1 sc in each sc (7 sc)
Rnd 8: *2 scs in first sc, 1 sc* 3 times, 1 sc in next 2 scs (10 scs)
Rnd 9-10: 1 sc in each sc (10 scs)
Fasten off leaving a tail for sewing in.

Muzzle:
Make a magic circle.
Rnd 1: ch 1, 6 scs in circle (6 scs)
Put a stitch marker in the first st of each row.
Rnd 2: 2 scs per sc (12 scs)
Rnd 3: 1 sc in each sc (12 scs)
Rnd 4: 1 sc in next sc, 2 scs in next sc (18 scs)
Rnd 5-7: 1 sc in each sc (18 scs)
Rnd 8: *2 scs in next sc* 4 times, sc in next 14 scs (22 scs)
Fasten off leaving long tail for sewing in. Stuff muzzle.

Finishing:

Sew muzzle to the head.


 |
| I tacked the legs down mid way to help the dog stand upright |

Sew the hind legs onto the body

Sew the tail onto the body


Weave in yarn ends.
Now start to attach embroidery floss and shimmer yarn. I used full strands. If you want to anchor the hair so it won't fall out, here is a good tutorial on how to do doll hair.

It helps to have a picture of a Yorkie. Here is a good photo or you can use the photo on the original pattern.

Embroider the nose.


I've had some questions about how to sew on the fur that is pulled up between the ears, so I'm adding this to help with this question.
Attach yarn at the bottom of the snout for the hair that is pulled up between the ears.

Once you have enough yarn attached, pull it up between the ears and use some attached yarn by the ears to tie the yarn up.


Sew some yarn at the base of the snout and pull it back between the ears and then tie it back. You can also use ribbon. Then sew on the buttons for the eyes.
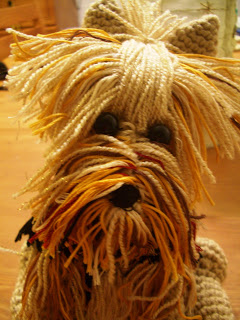
Here's how it looks from the back. The black fur is the black shimmer yarn.


YOU MAY ALSO LIKE:
 |
| Penguin Stocking |
 |
| Seahorse Applique |
 |
| Viking Helmet |
Perfect! Thank you! :)
ReplyDeleteYour welcome!
DeletePam what round would you add safety eyes ok.
DeleteThank you for translating this adorable pattern.
ReplyDeleteLove this doggie! Thank you for sharing.
ReplyDeleteWhat an amazing tutorial! Thank you for sharing :-)
ReplyDeleteYour welcome everyone!
ReplyDeleteIn toer 12 van het hoofd kom ik steeds 1 steek tekort. Er zou moeten staan 6 vasten en dan 2 steken samen, in plaats van 5 vasten.
DeleteHonestly, so Cute!!! I would actually consider making one of these. Thank you for the step by step layout!!
ReplyDeleteWonderfull
ReplyDeletehermoso oooo felicitaciones
ReplyDeleteHi, Thank you. When I saw this little guy late last night I was bring him to life, till wee hours this mornting. I am done about to put together. I am looking at your pictures and the body Black yarn. How'd you attach it??
ReplyDeleteThank you very much for posting this little fellow....
I sewed the yarn up underneath the base of the head and made it even lengths on both side and cut it. I went all around the head that way and then I sewed yarn underneath the yarn I had already done to make it thicker and then trimmed it a little longer than the first row. I did about 3 rows altogether.
ReplyDeleteOMG! Your awesome. Love this pattern!
ReplyDeleteThank you!
DeleteSo cute, thanks for sharing the pattern.
ReplyDeleteDo you have patterns for other breeds? I'd be interested in Schnauzers and Siberian Huskies. Thanks for this one too! Adorable and you've made it easy to follow!
ReplyDeleteI don't have any right now, but I could probably work something up. I'll post it on the blog when I do. If you are in a hurry, the books Ami Ami Dogs and Ami Ami dogs 2 have several different breeds done in amigurumi.
DeleteThanks Pam! No hurry, just curious. I'll be watching for your post.
Deletehttp://www.projectarian.com/2017/01/09/amigurumi-dog-fur-free-crochet/
DeleteFree Schnauzer doggie pattern if you are still looking for a pattern
Thank you for sharing such an adorable amigurumi yorkie. I love it. I cannot wait to make one. It would look great on my shelf with my porclain dolls. Thank you for translating the pattern. I checked out the other version of the pattern and I am so grateful that you translated it. Thank you and have a nice evening.
ReplyDeleteYour welcome!
DeleteThank you for this! I had seen that Yorkie Pattern and I took it and wrote it down so that I could make it and did, but it was one of the first things I had done and I didn't quite know how to put it all together correctly but it seemed to come out ok. Now I will use your instructions and try to make it again. I don't know how to send you a pic but I could show you a pic of the one I made from the original pattern and then I'll have to see how it comes out using your pattern which will be much easier!
ReplyDeleteYou can send a picture to my email at crochetparfaitpg@yahoo.com
DeleteVery beautiful dog! Thanks!
ReplyDeleteYour Welcome!
DeleteAdorei seu trabalho,muito bem feito.Parabéns!
ReplyDeleteObrigada
DeleteLoved your blog, very beautiful, thanks for kisses graphics, ja'm second
ReplyDeleteYour welcome.
DeleteHi, I love this pattern and your Yorkie looks amazing. However, is there somewhere I can get a really simplified set of instructins as I'm a beginner and really struggling to understand making a magic circle without it turning more into a tube. I'm from UK and so I'm not sure if terminology differs or if I'm just being really slow! I would love to make one of these for my mum and was told crochet was really easy but I'm starting to doubt that. Thanks!
ReplyDeleteYou can try this video by Crochet Geek
Deletehttp://www.youtube.com/watch?v=FHYVutk2iYY
Make sure you pull the tail tightly once you join your circle together. Once you finish the piece you can sew the tail in to make the hole stay closed.
If you are still having problems you can chain 2 and then do all the stitches in the second chain (first chain you made) from the hook.
Also, I'm not sure if you realize it or not, but UK crochet terms are different from US terms. A UK sc is an US dc (double crochet). To see how to do an sc US style take a look at my baby rattle pattern. It has graphics on how to do single crochet.
http://crochetparfait.blogspot.com/2012/07/baby-rattlecat-toy-pattern.html
Crochet Geek also has a good video tutorial on how to do single crochet. http://www.youtube.com/watch?v=8hwHtyJFMf0
There are links in the pattern for special stitches, like the sc2tog that will lead you tutorials.
Hola Pam,
ReplyDeleteEs un perro adorable! muchas gracias por el patrón.
Un abrazo.
De nada, disfrute!
DeleteHi Pam,
ReplyDeleteLoved this little Yorkie as soon as I saw the picture.
I have it made, and am now starting to put the "hair" on it. I don't understand how to
do that part. At first I was pulling yarn under a stitch, and wrapping it back around the
stitch to hold in place, but after looking over the instructions again, I removed what I had
completed, and started just pulling the yarn under the stitches, and letting it hang. If I do
that though, I thought that will just pull out of the stitches.
How do I actually keep the yarn "hair" in place?
You could try knotting the hair, close to the stitches, on either side, but I just pulled it through. I guess it depends on whether it's going to sit around looking pretty or get played with.
DeleteThanks Pam, I just can't find a knot I like the look of. Have no plans for it, so will probably just go with hoping it just sits around looking pretty.
ReplyDeleteI loved this pattern, it will join my 3 other yorkies, they look at it like what is that! I hope the little one doesn't get ahold of it to pull the hair out. My three are real yorkies.
Thanks again for this patter, it is the first time I have tried one like this.
Judy
I'd love to see a picture when you get it done. You can email it to me at crochetparfaitpg@yahoo.com.
DeleteI love the simple instruction. Thank you. Thinking that I could use the same basic body to make other dogs..possibility is endless.
ReplyDeleteYes, think you could, you may just have to change the ear shape.
DeleteDefinitely going to make this for mom so she can have her baby with her at work.
ReplyDeleteBEAUTFUL!!!! I'm from Brasil! and I love it!
ReplyDeletemy blog is: www.pontocomartesanatos.blogspot.com
:)
Thanks, I'll take a look.
Deletethanks a lot!! because of your talent in japanese tanslation I did mine...a girl as you can see
ReplyDeletehttp://www.zimagez.com/zimage/chienchien0.php
oh my, my mother in law would love this! super cute!
ReplyDeleteThank you so much for this pattern. I haven't been crocheting long but can work American patterns and translate to UK terms as I am going along. I am living in Ireland and I know that one of my adult daughters would absolutely love this. Here's hoping I can do it. Once again many many thanks.
ReplyDeletehair as you put the part that goes between the eyes.?
ReplyDeleteto give the hairstyle so
Sew yarn in at the base of the snout, then pull it upwards and tie a ribbon or yarn around it. Then sew on the buttons for eyes. I will make a picture and put it on the blog.
Deletethank you...
ReplyDelete:)
I just love the look of this adorable Yorkie. Since my youngest daughter has two REAL Yorkies, I am definitely going to give this pattern a go, although I have never tried to do an animal before...just mainly lapghans and afghans. Maybe I can get Miley and Endie to pose for me when it's time to assemble and put on the finishing touches! :) What do you think??? LOL Many thanks for posting this! Much appreciated.
ReplyDeleteYou can always take a picture of them. That's what I used.
DeleteUna preciosidad, intentaré hacerlo.
ReplyDeleteGracias, disfrute!
DeleteThank you for the awesome tutorial. I am going to try this in grey and see if I can make it look like a schnauzer! Thanks again!
ReplyDeleteYour welcome. I think this pattern will easily translate into a schnauzer.
DeleteThis Pattern is awesome! It looks like a real yorkshire. I will give this a try ;)
ReplyDeleteCutey Patuty Crochet
Thanks!
DeleteHi! I am Jei Crochet and I featured your Amigurumi Yorkshire on my weekly featured pattern on my blog. You can grab my I've been featured button. I love this pattern!
ReplyDeletehere is the link ;) Cutey Patuty Crochet
DeletePam, Your crocheted yorkshire really grabbed my attention and is wonderful. I don't know if you are selling your items and instructions and I hope i'm not sounding like a spammer but if you are interested, my website is an online craft marketplace to sell craft instructions, patterns and handmade products. We are just starting out and it's free to join and post products. ecraftandshare.com
ReplyDeleteI'm saving this pattern~ i want to make it for my friend's birthday, fortunately not until February. This will take me a while, as I'm in the middle of two baby blankets and a queen-sized spread in size 10 thread. But I will prevail!
ReplyDeleteThis pattern should be a lot less work than that queen-sized spread. My hat is off to you!
DeleteBlankets are finished! So I've got the dog made...and I know I'm going to have to make a Skippyjon Jones next (he's a chihuahua, and this pattern would be perfect) and I have some questions. Does it matter what order you do the hair in? Black first? And I wasn't able to find the exact brands, but I think they'll work. I've got black bamboo viscose instead of the shimmer. But how long did you cut the strands? and how much did you use?
DeleteMy many grateful thanks,
Espectacular trabajo!!!! Parece realmente un perrito.
ReplyDeleteGracias!
Deletebellisimo ...y un trabajo de enano ...te felicito, por tu arte...bs
ReplyDeleteGracias!
DeleteThank you so much for all your patterns. You make me wish I had more time to crochet. If I eliminate sleeping and eating, maybe I can make all the things I want to make.
ReplyDeleteThanks!
DeleteGorgeous pattern - and I've got just the person who'd love one! :)
ReplyDeleteOh my goodness!! This is fantastic!! Exactly what I was looking for!! Thank you so much for sharing! I can't wait to make this little cutie!!
ReplyDeleteI got a question asking about the order of sewing on the fur. On the legs, sew on the fur from the bottom up so you can see what you are doing. Other wise the yarn will cover up where you need to sew on next. The yarn I used is just a suggestion, other crocheters have used different yarns to great effect, check out these examples on Ravelry.com. http://www.ravelry.com/patterns/library/yorkie-tutorial/people
ReplyDeleteVery cute, love it :)
ReplyDeleteThanks!
DeleteExcelente gracias
ReplyDeleteJe découvre aujourd'hui ce merveilleux York !! superbe merci pour ce partage de photo et de tuto
ReplyDeleteMerci!
DeleteHi i like this patter But I have found a few mistakes in it in Rnds 12 to 18 and a few more further down I tried it the way it has been written but I couldn't get the right sts. But i managed to make this cute little yorkie. Thanks for the pattern
ReplyDeletehello I found mistake too, and I could not figure how to make it. what did you do pls tell me.. ty
DeleteI also found that when I started decreasing in Rnd 12 I just couldn't get it right.
DeleteThis is how I fixed it.
Rnd 12: sc in next 6 scs, sc2tog. (42 scs)- That is 6cs + 1sc (the 2tog) = 7 x 6 panels = 42 scs.
Rnd 13: sc in each sc. (42 scs)
Rnd 14: sc in next 5 scs, sc2tog. (36 scs)
Rnd 15: sc in next 4 scs, sc2tog. (30 scs)
Rnd 16: sc in next 3 scs, sc2tog. (24 scs)
Rnd 17-18: sc in each sc. (24 scs)
What are the finished dimensions of this?
ReplyDeleteThis is soo amazing! Is there a way I could pay you to make one these for me? I wish I had the time for this but I don't and my mamaw just lost her yorkie and this would be perfect.
ReplyDeleteI'm sorry, but I don't really have the time to do it. But you are welcome to take the pattern to a yarn shop or to look on Etsy for a crocheter to make it for you. There are several crocheters on Etsy that do custom work. Etsy.com. If you would like a pdf version of the pattern, email me at crochetparfaitpg@yahoo.com. Be sure to let me know what you want, I get a lot of email, thanks.
DeleteI would have no problem making one for you if you have not already found someone. You can email me at hooksnyarn13@gmail.com
DeleteThe feet didn't look right to me.. so I looked at the original pattern and I think you have yours on the wrong way. Im pretty certain the part sewed to him is the foot pad, not the leg. I've just begun working on this little guy (: Thank you for translating the pattern. I'm essentially going to make 4. Two big ones , and two puppies (: they're going to be for my boyfriends daughter and his neice. They're going to love these little gems! Thank you so much ! Here's to happy crocheting.
ReplyDeleteI love your pattern. I will make it for my best friend. Thank you
ReplyDeleteI see that someone mentioned making a bigger one then using your pattern for the puppies. How would you make this bigger? I'm going to give it a try and see. Thanks for the translation! Great job!
ReplyDeleteYou could try using heavier yarn and a bigger hook. Or make this one as the older dog and use a smaller hook and lighter yarn for the puppies.
DeletePam could you please explain doing the hair . I never did this before but want to learn. Do you go in one stitch and up the next one.
ReplyDeleteHow big is this yorkie when it is finished, if we use your crochet hook size?
ReplyDeleteEvet süper olmuş teşekkürler
ReplyDeletethanks for sharing . such a wonderful tutorial easy to follow for beginner amigurumi crocheter...my first amigurumi try was disaster. It doesn't look like a Dog instead my Husband said look like a Sheep.
ReplyDeleteWell, if it looks like a sheep, tell everyone that's what you meant to make!
DeleteI don't know how to paste the Picture here, also I have some question, call me a dumb but it makes me confused.
DeleteOn round 19. 1 sc, dec= 12 sc.
when I follw the instruction 1 sc, dec that will be 18 sc? pls help me what will I do..
And pls tell me where I can get the Picture of my dog/sheep.
I put it on your FB site, look at it pls.
Deletehello Pam,
ReplyDeleteRnd 9-13: 1 sc in each sc (12 scs)
have a question about the pattern of the Hind legs . :: Rnd 14: sc2tog, 1 sc in next sc (6 scs )
How did it become 6 scs?
Is it sc2tog , so it will be ( 6 scs ) left?
Correct me if I am wrong pls.
Thank you very much
so cute ! Thanks for sharing the pattern.
ReplyDeleteI am not very good at amigurumi, but this one I'm going to try out !
(From a groomer) The part on a Yorkie head goes from the outside eye corner to the inside ear corner, straight across to the other inside ear corner, and form the other outside eye corner to the inside ear corner on that side, making a square, with the hair growing between the eyes also being pulled up into the topknot. Hold the hair straight up, place a band, the fold over toward the back of the head and place a second band directly over (or on top of) the first band. The hair ends should go back between the ears and blend in with the rest of the hair on the head and neck. No hair from the back of the head or the neck goes into the topknot. This will help your pup look more realistic. Hope this helps! LOVE the pattern! I plan to make my own soon, and maybe a schnauzer as well!
ReplyDeleteI don't suppose you do, or would feel like doing, a pattern for a Chihuahua?
ReplyDeleteThis is amazing! Can I use the pattern pic on my yorkie website and direct people here for the pattern? It is so cute I would like to pass it on!
ReplyDeleteOf course, you are welcome to do so!
DeleteThis is wonderfully written up, and the pics are great! Thank you for making it available.
ReplyDeleteThis is so cool! And the tutorial is amazing! Thanks for sharing!
ReplyDeleteCute? Sweet? Adorable? Lovable? Brilliant? None of those words measure up, so I'm going to throw my dictionary away. I love this little pup. When I first saw the pic, it thought it was crochet booties and a bow on a real dog. Just amazing.
ReplyDeleteSuper cute!!
ReplyDeletehermoso,me encantaría poder imprimir las instrucciones,sería posible,de ser así les envío un gracias gigante !!!
ReplyDeleteNecesito tu correo electronico para enviarlo. Si no quieres poner aqui, mi email es crochetparfaitpg@yahoo.com. Dime cual patron quieres.
DeleteI really appreciate u giving us this pattern. I used to have an adorable Yorkie!!! I'm a novice at crocheting. My question is on Round 13-16 , am I supposed to continue with sc all the way around?
ReplyDeleteI'm not sure if you are talking about the body or the head, but in each case from rows 14 to 16 you will be doing a specified amount of scs followed by a decrease (sc2tog). This lowers the stitch count as you move from row to row. So for example
DeleteRnd 14: 1 sc in next 5 scs, sc2tog (36 scs) do one sc in each of the next 5 scs and then do a sc2tog over the next 2 scs, then repeat 6 times until you have made 36 stitches altogether (I called them all scs because this is what they look like but there will actually be 30 scs and 6 sc2tog stitches. If you don't know how to do the sc2tog stitch you can find it here http://crochetparfait.blogspot.com/p/sc2tog.html
Thank you so much!!!!! My daughter sent me this pin a year ago from the sight you mentioned. I couldn't get a good translation and told her I couldn't do it. Now I can make it and surprise her big time!
ReplyDeleteGlad I could help!
DeleteThank you so much!!!!! My daughter sent me this pin a year ago from the sight you mentioned. I couldn't get a good translation and told her I couldn't do it. Now I can make it and surprise her big time!
ReplyDeleteLove yorkies this is soooo cute!
ReplyDeleteLove yorkies this is soooo cute!
ReplyDeleteAbsolutely LOVE this pattern! So glad you translated it. I saw it and HAD to make it for a friend. This was my first try at crocheting anything like this. Thank you, thank you, thank you! I published the pic of my finished pup on my FB page and EVERYONE loved it!
ReplyDeleteThanks! I'm glad I could help.
DeletePam,
ReplyDeleteI do not see instructions on how to make the black fur or how/where to attach it. Am I missing something?
It's basically done the same way as the other fur. I plan on putting up a video tutorial in the near future to show how to attach the fur.
DeleteThank you for answering my question. I have almost finished this little guy only in black. It's been so much fun!
DeleteCarolyn
Send me a picture when you're done and I'll post it on the blog, you can send it to crochetparfaitpg@yahoo.com
DeleteThis comment has been removed by the author.
ReplyDeleteThank you so much for sharing this pattern " I made 2 and i have to make one more now! I shared my Yorkies around and they got rave reviews <3 I was sure to post your link to each post i made and the pattern...
ReplyDeleteChristie
Thanks!
DeleteHi. Did you do a video yet for attaching the hair? That's the only part I'm trying to figure out all the areas. Thanks.
ReplyDeleteI'm working on it. If you subscribe to my Youtube channel you'll know as soon as it goes up. https://www.youtube.com/channel/UC397QDiNhtJZokyzQLJ6biQ/videos
DeleteHow absolutely adorable. Thank you for the FREE pattern. So many want 'paid' for their inspiration. You are truly generous. Thanks again.
ReplyDeleteIf you have any other animal patterns, ie frog etc. would love to know.
ReplyDelete
ReplyDeleteHi
I'm Nanske from Belgium
I have a FB group and my members asked me if I would translate your wonderful dog into Dutch
This is the picture they sended me
Can I please have your permission ??
I will put the link to your webpage or blog on it or I give you the translation and put the link to it on my group
Greetings and Blessings
NanskePanske
Yes, you are welcome to translate the pattern.
ReplyDeleteLook what I saw this morning
ReplyDeleteI dont think you gave permission
http://www.craftsy.com/pattern/crocheting/toy/yorkie-dog-pattern/201449
Hi there, someone is selling this pattern on craftsy: http://www.craftsy.com/pattern/crocheting/toy/yorkie-dog-pattern/201449
ReplyDeletehi!
ReplyDeleteI like your yorki so much:9. But maybe i missed something,but i could find, how much rows do you make after the increase and before you start to decrase.I see just you inrease until 48 and after you start decrease...Can you help me please?:)
Thanks so much!
For both the body and the head, after you have increased to 48 stitches you do 2 rows (10 and 11) with no increases or decreases, then you start to decrease on row 12.
DeletePam I typed in your you tube & im sorry but it was not nothing about the fur for the dog it was something else please help me . Please email me ok not sure what happened.
DeleteHi Pam! I've loved this pattern since I first saw it a long time ago and am finally getting around to making it. I do have a question though. I'm a single, disabled mom so obviously my funds are limited and unfortunately I don't have a car. So I was wondering if it is absolutely necessary to use the embroidery floss and the black glossy or if you think I could get away with using regular yarn for the hair? I really want to make it but if it isn't going to look right using regular yarn then I don't want to waste my time.
ReplyDeleteThank you for translating the pattern. Your work is beautiful!
OMG this is the cutest pattern, you are so wonderful to post for free. It's looks like a challenge, I have never done Amigurumi. This is so darn cute I have to try it. I have a lion that I got off a website and it's very similar in the look although it looks like a lion. I have a feeling this is Amigurumi also. I have not tried the pattern as I have no small children left in the family.
ReplyDeleteHi Pam busy making the Yorkie. Trying to find the tutorial on putting on the back hair. Is there one? Do I go down the length (middle) of the back? What happens with the tail? I see their is black hair under the head too. How do I do that? Would really appreciate your help! Thanks for sharing this cute pattern.
ReplyDeleteA very cute pattern! I just downloaded it and will try crocheting the Yorkie tonight! Thank you .
ReplyDeleteQue belleza!!!!! Gracias por el tutorial!! Genia!!!!!
ReplyDeleteHi Pam do you have further videos for the rest of the fur?
ReplyDeleteI have wanted a Yorkie for a long time, however we can only have two pets in our apartment. We currently have a ShihTzu and a toy poodle. Crocheting a Yorkie will let me get one now? Thank you!
ReplyDeleteHi Pam, I was looking for the instructions for the black fur. Am I missing it somewhere? How to make it and attach it? Please advise. Thanks. I love this little Pooch. He's adorable.
ReplyDeleteI wish I can crochet as you!
ReplyDeleteI have also a blog for beginners: beginnercrochet.club/sc2tog-single-crochet-2-together
In your video for the hair, you said you were going to do a video for the back and leg hair. I can't find it Can you tell me how to find it?
ReplyDeleteI love the Yorky buzy making my son 1 he lost his Yorky called Gummies and this will make him feel beter
ReplyDeleteHi Pam am on my second Yorkie -has a very different personality to the first! Thanks for the pattern x
ReplyDeleteAwesome !! Love how U show detail step by step !! Thank you sooo much ! : ) This will be my first pet to crochet
ReplyDeleteThis comment has been removed by the author.
ReplyDeleteInteresting stuff to read. Keep it up.
ReplyDeleteVisit this profile Andrea Gonzalez
Hi I love your dog, but I need help?
ReplyDeleteTrès beau modèle mais il manque la hauteur ou nombre de rangs pour mettre les yeux. Merci
ReplyDeleteHi Pam, I want to know in what rows do you put the safety eyes and how far apart? Thanks :)
ReplyDeleteThis dog is adorable! I love it
ReplyDeleteHi Pam, I'm making this adorable yorkie as a Christmas gift and it's coming out great. Only problem, I can't seem to find directions anywhere here, or the video, of how you sew on the hair around the body and legs. Can you please help me.
ReplyDeleteThanks!
Hi there,
ReplyDeleteThank you so much for the post you do and also I like your post, Are you looking for chihuahua puppies for sale near me in the whole USA? We are providing petfinder, teacup chihuahua puppies for sale near me, blue chihuahua puppies for sale, chiweenie puppies, chihuahuas for sale, chihuahua puppies for sale near me, chihuahua puppies for sale in ohio, puppies for sale near me, chihuahuas for sale near me, chihuahua puppies for adoption as a pet with the well price and our services are very fast. Click here for Email: info@miniteacuppuppiesforsale.net
If you are searching for Teacup Puppies Breeders, then your search ends here. We are well -respected breeders and we are breeding puppies for more than 15 years now. We have gained the trust and confidence of many families who have relied on us to help them find the best puppies.
ReplyDeleteTeacup Puppies For Sale
E-mail: info@premiumteacuppuppies.com
Hi there,
ReplyDeleteThank you so much for the post you do and also I like your post, Are you looking for chihuahua puppies for sale near me in the whole USA? We are providing petfinder, teacup chihuahua puppies for sale near me, blue chihuahua puppies for sale, chiweenie puppies, chihuahuas for salechihuahua puppies for sale near me chihuahua puppies for sale in ohio, puppies for sale near me, chihuahuas for sale near me, chihuahua puppies for adoption and our services are very fast.
Click here for Email: info@miniteacuppuppiesforsale.net
Hi there,
ReplyDeleteThank you so much for the post you do and also I like your post, Are you looking for Buy jovial yorkie puppies Online in the whole USA? We are providing Buy jovial miniature pups.yorkie puppies,yorkie puppies for sale,yorkie puppies for sale near me,yorkie puppies teacup For sale,yorkie puppies near me,yorkie puppies for sale,yorkie puppies for sale,yorkie puppies for free,yorkie puppies adoption,yorkie puppies white,yorkie puppies newborn,yorkie puppies for sale ,yorkie puppies for sale texas,yorkie puppies to adopt,yorkie puppies price,yorkie puppies for sale in florida,yorkie puppies pictures,yorkie puppies mix,yorkie puppies for sale californi,price for yorkie puppies,with the well price and our services are very fast.
Click here for MORE DETAILS......
CONTACT INFORMATION
Email: sales@jovialyorkiepuppieshome.com
Hi There,
ReplyDeleteThank you so much for the post you do and also I like your post, Are you looking for Mini Corgi puppies for sale in the whole USA? We are providing premium teacup puppies,teacup dogs for sale,yorkie puppies for sale near me,yorkie for sale near me,micro puppies for sale,puppies for sale detroit,teacup puppies near me,mini puppies for sale,yorkie puppies for sale,pet adoption near me,yorkie breeders in michigan,micro poodles for sale near me,havanese puppies for sale near me with the well price and our services are very fast.
Click here for more information
Contact Us:https://www.premiumteacuppuppies.com/
your post is amazing please visit my site for more information if you are looking for
ReplyDeleteexotics pet shop near me, exotics pet store, exotics pets for sale, exotics pets for sale in texas
Contact Us:https://www.starburkexotics.com/avalablepets
Are you looking for that lifelong companion that will be a perfect partner? Your search is finally over. We specialize in breeding small, teacup, toy, and miniature puppies for sale me now ready for any lovely home. They are vet checked and potty trained, mom and dad are AKC registered and have all papers: Visit Our Website: https://sunshineteacuppuppieshome.com/
ReplyDeleteteacup french bulldogs for sale
mini french bulldog puppies for sale
french bulldog puppies for sale
micro french bulldogs for sale near me
french bulldog for sale near me
miniature french bulldog puppie for sale
mini teacup french bulldogs for sale
I wish I knew how to crochet. I love your Yorkie!
ReplyDeleteHi there,
ReplyDeleteThank you so much for the post you do and also I like your post, Are you looking for havanese puppies Online in the whole USA? We are providing havanese puppies for sale in ohio,havanese puppies for sale florida,havanese puppies for sale in pa,teacup havanese puppies for sale,havanese mix puppies for sale near me,havanese puppies for sale in Michigan,havanese puppies for sale in nc,havanese puppies for sale in Texas,havanese puppies near me,havanese puppy cut,full grown havanese puppies,black havanese puppieshavanese puppies Colorado,havanese puppies florida,havanese,havanese dog,havanese puppies for sale near me,havanese puppies for in California,havanese rescue,havanese poodle,havanese breeders,havanese dog for sale with the well price and our services are very fast. Click here for MORE DETAILS......
CONTACT US
Email:info@havanesespot.com
ReplyDeleteHello
Please i just took up macaw breeding as a hobby after my mom passed away because they were her favorite birds. Despite the fact that they are very intelligent, am finding it very difficult getting them to mate.
For any information CLICK HERE QUAKER PARROT FOR SALE.THANKS
ReplyDeleteHello
Please i just took up LABRADOR PUPPIES breeding as a hobby after my mom passed away because they were her favorite PUPPIES. Despite the fact that they are very intelligent, am finding it very difficult getting them to mate.
For any information CLICK HERE LABRADOR PUPPIES FOR SALE.THANKS
Thanks for the wonderful information's about havanese puppies. Keep Sharing
ReplyDeletechocolate havanese puppies for sale
Email Id>>>>>>>>>info@havanesespot.com
Website>>>>>>>https://havanesespot.com/
I thank you for all the powerful insights you are sharing with us. We really appreciate the effort that you've gone to. Please keep going for all to benefit from you.
ReplyDeleteGolden Retriever Puppies For Sale
ReplyDeleteGolden retriever Puppies For Sale in pa
Labrador Retriever Puppies For Sale
Golden Retriever Puppies For Sale Near me
floral bags
ReplyDeleteHere at Bijou Teacup Puppies we have very healthy and ready to go puppies happy to move into a new home.
ReplyDeletebuy teacup yorkie puppy online
Call US>>>>>4342178041
Website>>>>>https://www.bijouteacuppuppies.com/
Looking for Best Eyebrow threading and limination salon and studio in Dubai ? AL Marasim offering reliable services in all over Dubai. For quotes call us at (+971) 501866286
ReplyDeletehenna salon in dubai
Nice Post!!
ReplyDeletePlease look here at Teacup Chihuahua Puppies for Sale
ReplyDeletehttps://www.yorkiespuppiessale.com/
https://www.yorkiespuppiessale.com/teacup-yorkie-for-sale/
https://www.yorkiespuppiessale.com/yorkie-puppies-for-sale/
https://www.yorkiespuppiessale.com/yorkies-puppy-for-sale/
https://www.yorkiespuppiessale.com/yorkshire-puppies-for-sale/
https://www.yorkiespuppiessale.com/yorkie-puppy-for-sale/
https://www.yorkiespuppiessale.com/yorkies-for-sale/
https://www.yorkiespuppiessale.com/yorkie-for-sale/
https://www.yorkiespuppiessale.com/teacup-yorkies-for-sale/
https://www.yorkiespuppiessale.com/yorkshire-for-sale/
https://www.newdaypuppies.com/
ReplyDeletehttps://www.newdaypuppies.com/teacup-yorkie-puppies-for-sale/
https://www.newdaypuppies.com/yorkshire-terrier-for-sale-near-me/
https://www.newdaypuppies.com/yorkie-for-sale-near-me/
https://www.newdaypuppies.com/yorkies-for-sale/
https://www.newdaypuppies.com/yorkie-poo-for-sale/
https://www.newdaypuppies.com/yorkie-for-sale/
https://www.newdaypuppies.com/yorkshire-terrier-for-sale/
https://www.newdaypuppies.com/yorkie-puppy-near-me/
pedicure jlt dubai
ReplyDeleteHi There,
ReplyDeleteThank you for sharing the knowledgeable blog with us I hope that you will post many more blog with us:-
Pug will happily spend much of the day snuggling on the sofa’”which, combined with the breed’s fondness for eating, makes obesity a real possibility. But the Pug is playful, sturdy, and lively, too, and owners can keep the breed fit with daily opportunities for moderate exercise, such as walks or play sessions in the yard.
Email:frenchiepugsforsale@gmail.com
Phone: +1 (804) 596-2239
Click here for more information:- more details
경주출장샵
ReplyDelete