Materials:
- Red Heart Shimmer White Yarn
- Pattons Kroy Sock Yarn, Cascade Colors or Red Heart Shimmer Blue Yarn
- Red Worsted Weight Yarn (small amount)
- Dark Green Worsted Weight Yarn (small amount)
- Brown Worsted Weight Yarn (small amount)
- Vanna's Glamour Yarn, small amounts red and topaz
- White Worsted Weight Yarn (small amount)
- Black Worsted Weight Yarn (small amount)
- Orange Worsted Weight Yarn (small amount)
- Gray Worsted Weight Yarn (small amount)
- Aunt Lydia's Fashion Crochet Thread Size 5 Gold
- G Hook
- J Hook
- 3.25 mm Hook
- Polyfil Stuffing
- 8 doily Hook
- Tapestry Needle
- Sewing Needle
- Sticky back black felt
- Thin Green Ribbon
Special Stitches:
Hdc2tog--Half Double Crochet Two Together--Yarn over (YO) hook, insert hook into stitch (st), pull up a loop, 3 loops on hook. YO hook, insert hook into next st, pull up a loop, 5 loops on hook. YO hook, pull through all 5 loops on hook.
 |
| YO |
 |
| Insert in st, YO |
 |
| Pull up a loop, Three loops on hook |
 |
| YO |
 |
| Insert Hook in st |
 |
| YO |
 |
| Pull up a loop, 5 loops on hook |
 |
| YO |
 |
| Pull through all loops on hook |
 |
| Hdc2tog |
Abbreviations:
YO--yarn over st(s)--stitch(es) ch(s)--chain(s)
sc(s)--single crochet(s) sl st(s)--slip stitch(es)
sc2tog--single crochet two together
hdc(s)--half double crochet hdc2tog--half double crochet two together
BLO--back loop only
Angie at
Le Monde De Sucrette has a really cute pattern for
Little Christmas Socks that has a great graphic for how to put socks together. I used it to help me design this larger stocking.
TOE
With
Red Heart Shimmer White Yarn, make a
Magic Circle and ch 1.
Rnd 1: 8 scs in circle, sl st into first sc. (8 scs)
Rnd 2: Ch 1, 2 scs per sc all the way around, sl st into first sc. (16 scs)
Rnd 3: Ch 1, *1 sc in first sc, 2 scs in next sc* repeat all the way around, sl st into first sc. (24 scs)
Rnd 4: Ch 1, *1 sc in next 2 scs, 2 scs in next sc* repeat all the way around, sl st into first sc. (32 scs)
Rnd 5: Ch 1 *1 sc in next 3 scs, 2 scs in next sc* repeat all the way around, sl st into first sc. (40 scs)
Rnd 6: Ch 1 *1 scs in next 4 scs, 2 scs in next sc* repeat all the way around, sl st into first sc. (48 scs)
Rnd 7 to 23: Ch 1, 1 sc per sc all the way around, sl st into first sc. (48 scs) Do not fasten off the arch and heel of the sock will continue off the toe.
ARCH
Row 1: Continuing off Toe, ch 1, sc in same sc, and in 29 more scs (30 scs)
Row 2: Ch 1, Turn. Sc in same sc and in each sc across (30scs)
Row 3 to 20: Repeat Row 2 (30 scs per row)
HEEL
Rows 21 to 23: Ch 1, sc in same st, do 7 more scs, then 14 hdcs, then 8 scs. (30 sts)
Row 24: Ch 1, Turn. Sc in same st, sc 7 more times, 2 hdcs, hdc2tog, hdc, hdc2tog, hdc2tog, hdc, hdc2tog, 2 hdcs, 8 scs (26 sts)
Row 25: Ch 1, Turn. Sc in same st, sc 7 more times, *hdc, hdc2tog* 3 times, hdc, 8 scs (23 sts)
Row 26: Ch 1, Turn. Sc in same st, sc 7 more times, 3 hdc2togs, hdc, 8 scs (20 sts)
Row 27: Ch 1, Turn. Sc in same st, sc 3 more times, *sc2tog, sc* 4 times, 4 scs (16 sts)
Row 28: Ch 1, Turn. *sc, sc2tog* 5 times, sc. (11 sts)
Sl st edges together to join heel.
LEG
Attach white yarn where the ARCH meets the TOE.
Rnd 1: Ch 1, do 1 sc per sc across the top of the TOE and then approximately at the end of each row on the ARCH and the HEEL for 76 total scs. The rest of the leg will be done in a spiral. It helps to put a stitch marker in the first stitch of each row, so you know where you are.
Rnd 2 to 9: sc in each sc (76 sts per rnd). (If you want the leg to taper in a little go to Rnd 10, if you don't continue in each sc to rnd 30.)
Rnd 10: Make sure you have your stitch marker in the first sc of this row. Do 36 scs, *
sc2tog, sc* 7 times, continue scs to stitch marker.
Rnd 11: Sc, *sc2tog, sc* 7 times, 38 scs, *sc2tog, sc* 3 times.
Rnd 12: 12 scs, *sc2tog, sc*3 times, sc around to stitch marker.
Rnd 13 to 30: sc in each st around
Rnd 31: Sc, start next sc, add Cascade Colors or Blue Shimmer Yarn, sc to the edge (see picture), start next sc, add White Yarn(you can either cut the blue yarn or carry it under the white yarn, I decided to cut the yarn and weave it in so I wouldn't have a lot of loose threads inside the stocking to make it easier to stuff) and sc around to 2 sts before blue yarn started.
Rnds 32 to 46: The blue scs move to the right one sc per row. Do the last full white sc 2 scs before the blue starts on the previous row, then start the next white sc and add the blue yarn and sc to the edge, then start the next blue sc and start the white yarn again.
Rnd 47: Start this rnd like you did 32 to 46, when you get to the edge, start the next sc and then add the Red Yarn, sc around to front.
Rnd 48 to 49: Sc in red yarn, at the end of Rnd 49, start the sc just before you turn the stocking back towards the blue side, add the White Yarn.
Rnd 50 to 56: Sc in each sc around.
Rnd 57: Sc to edge, start next sc and add Red Yarn, sc around to blue side
Rnd 58: Sc in red
Rnd 59: Sc in red to right edge, ch 14, then continue sc in next sc and contiue around.
Rnd 60: Sc to right edge, 18 scs in ch-14 sp, then start scs again on rnd, continue scs to just around back of left edge, sl st into next sc and fasten off.
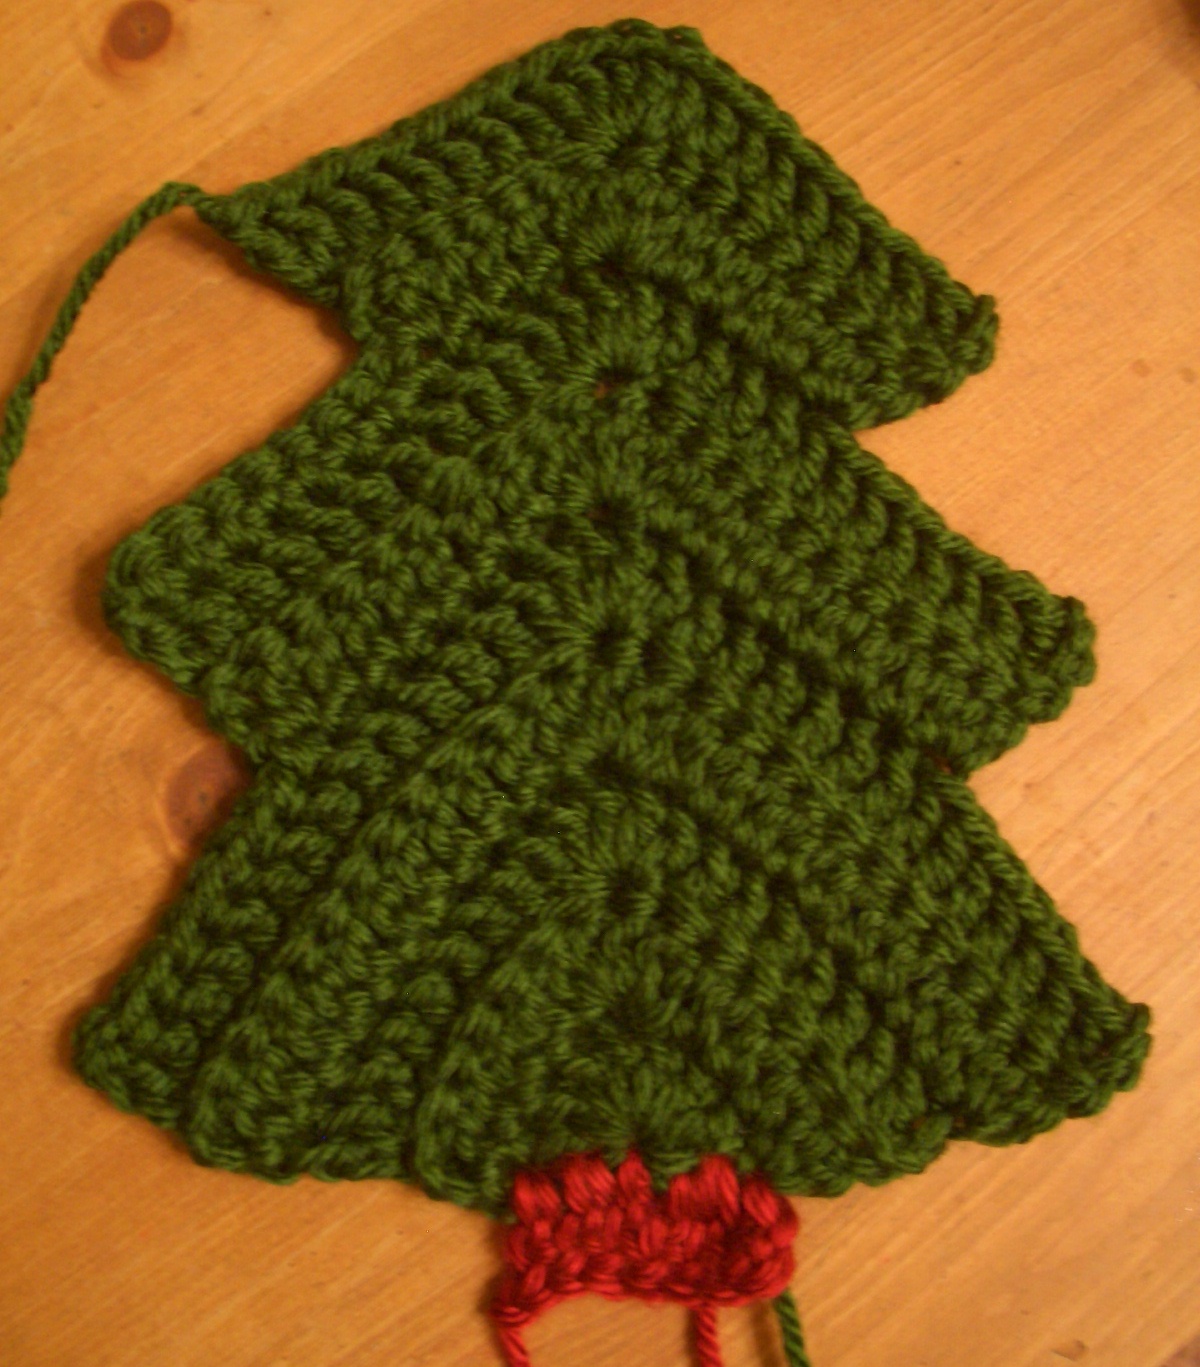
I used this
little tree pattern by Linda Permann for the Christmas tree applique.
I used a G hook,
Dark Green Worsted Weight Yarn and stitched in BLO except for the 5 st increase in center st. I only made one row on the stump with the
Brown Worsted Weight Yarn.
Ornaments
With 3 (3.25 mm) size hook and
Vanna Glamour Yarn make a Magic circle,
Rnd 1: ch 1, 6 scs, sl st to first sc, pull circle tight,
Rnd 2: Sc in next sc, fasten off leaving a long tail. Sew ornament onto tree.
Make as many ornaments as you like. I made 7 red and 5 gold.
I based the penguin on the
Peso the Penguin pattern from
Crochet is for Lovers. I changed the face, the eyes and the body, but I used the rest of the pieces from the Peso pattern. I used an F hook for the rest of the pieces. I used
orange yarn for the feet and beak and the
Patton Kroy Sock Yarn for the hat and scarf.
For the eyes I used black felt with a sticky back, cut into ovals.
Penguin Face
The penguin face and body are half spheres, so I started with a magic circle to make them round up. The decreases at the end round the sphere back down. Since they are done in rows, you will always be doing the first sc in the first stitch.
You will be carrying the black and white yarns on the back of the penguin head and body.
With G hook and
Black Worsted Weight Yarn, make a
magic circle.
Row 1: Ch 1, 4 scs in ring,
don't tighten ring yet. (4 scs)
Row 2: Ch 1, turn. 2 scs per sc. Pull ring tight. (8 scs)
Row 3: Ch 1, turn. *Sc , 2 scs in next sc* 4 times. (12 scs)
Row 4: Ch 1, turn. *1 sc in next 2 scs, 2 scs in next sc* 4 times. (16 scs)
Row 5: Ch 1, turn. 1 sc in next 3 scs, start next sc, add
White Worsted Weight Yarn, do next sc in
same st, 1 sc in next sc, start next sc, add
Black Yarn, sc in next sc, 2 scs in next sc, start next sc, add
White Yarn, sc in next 2 scs, start next sc, add
Black Yarn,
sc in same sc, 3 scs, 2 scs in last sc. (20 scs)
Row 6: (
from row 6 to row 11 there will only be 1 sc per st) Ch 1, turn. 3 scs, start next sc, add
White Yarn, 4 scs, start next sc, add
Black Yarn, sc, start next sc, add
White Yarn, 4 scs, start next sc, add
Black Yarn, sc to end of row. (20 scs)
Row 7: Ch 1, turn. 2 scs, start next sc, add
White Yarn, 13 scs (
carry black yarn on back side of face), start next sc, add
Black Yarn, sc to end (20 scs)
Row 8: Ch 1, turn. 1 sc, start next sc, add
White Yarn, 15 scs (
carry black yarn on back side of face), start next sc, add
Black Yarn, sc to end (20 scs)
Row 9 to 11: Repeat row 8. (20 scs)
Row 12: Ch 1, turn. 1 sc, start next sc, add
White Yarn, sc, sc2tog *3 scs, sc2tog* 2 times, sc, start sc2tog, add
Black Yarn, sc in last 2 sts. (16 sts)
Row 13: Ch 1, turn. Sc, start next sc, add
White Yarn, sc2tog, *2 scs, sc2tog* 2 times, start sc2tog, add
Black Yarn, sc in next 2 scs. (12 sts)
Row 14: Ch 1, turn. sc, start sc2tog add
White Yarn, *sc, sc2tog* 2 times, sc start next sc, add
Black Yarn, sc2tog. (8 sts)
Row 15: Ch 1, turn. Start sc2tog, add
White Yarn, sc2tog, start next sc2tog, add
Black Yarn, sc2tog. Fasten off leaving a long tail for sewing. (4 sts)
Penguin Body
With G hook and
Black Worsted Weight Yarn, make a magic circle.
Row 1: Ch 1, 4 scs in circle,
Do Not Tighten Circle Yet. (4 scs)
Row 2: Ch 1, turn. 2 scs per sc. Pull magic circle tight.(8 scs)
Row 3: Ch 1, turn. *Sc, 2 scs in next sc* 4 times (12 scs)
Row 4: Ch 1, turn. *2 scs, 2 scs in next sc* 4 times (16 scs)
Row 5: Ch 1, turn. Sc, start next sc, add
White Worsted Weight Yarn, 11 scs (carry black yarn), start next sc, add
Black Yarn, 2 scs. (16 scs)
Row 6 to 9: repeat Row 5.
Row 10: Ch 1, turn. sc, start next sc, add
White Yarn, *sc2tog, sc in next 2 scs* 2 times sc2tog, sc, start next sc, add
Black Yarn, sc2tog. (12 sts).
Row 11: Ch 1, turn, start sc, add
White Yarn, *sc2tog, sc* 2 times, sc2tog, start next sc, add
Black Yarn, sc2tog. (8 sts)
Row 12: Ch 1, turn. Sc2tog 4 times in Black Yarn. (
this is the top of the body). Fasten off, leaving a long tail for sewing. (4 sts)
Assembly
Once you have made all the
pieces start assembling the penguin. Sew it together using the long tails you have left after fastening off.
This is what the penguin looks like with all the parts sewn together. (Don't sew it on the the stocking just yet.)
Pin Tree to stocking and sew on with Green Yarn, making sure to only sew it onto the front of the stocking so you don't seal the opening.
Put Polyfil stuffing in the back of the penguin.
Place Penguin on stocking and sew down using Black Yarn, making sure to not sew the stocking together. You can put you hand inside the stocking while you are sewing to help you accomplish this.
Now you can start sewing on little details, like little stars on the blue sky. I did it with Red Heart Shimmer White.
Add some shading by embroidering with gray yarn.
Add a large star. I got this
pattern from
Mygurumi. I used gold thread and an 8 hook.
And finally, sew on the name with a sewing needle, I used thin green ribbon.
Merry Christmas!
You May Also Like: