A while back Rose asked me to make some Native American themed granny Squares. She's a member of a tribe at Shelton Wa, known as the "People of the Water". They have Elders luncheons every other year where they have raffles. Her passion is crocheted afghans, so she asked me to make a design for either a fish or an American Eagle. This is my fish design. I plan on making an Eagle design in the future.
Size
8 1/2" square (can be made smaller with a smaller hook and yarn)
Gauge
4 sts per 1", 2 dc rnds = 11/2"
Materials
- H Hook
- Worsted Weight yarn (Red, Black and White)
- Tapestry needle
- Thin needle with large eye
- 6-1/2" white buttons with 4 holes
- Embroidery thread, black
Special Stitches
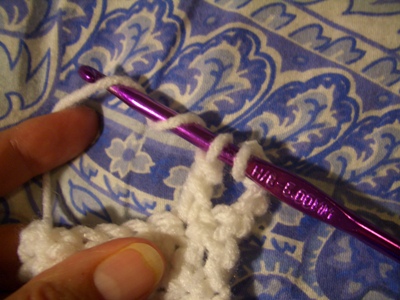
Dc SPIKE--double crochet spike stitch--Yarn over (YO), insert hook in bottom of double crochet (dc) round below level of stitches (sts), YO, pull up a loop, YO, pull through 2 loops, YO pull through 2 loops.
 |
| YO |
 |
| Insert hook |
 |
| YO |
 |
| Pull up a loop |
 |
| YO |
 |
| pull through 2 loops |
 |
| YO, pull through last 2 loops |
 |
| Dc SPIKE |
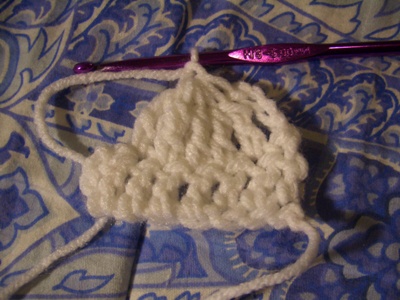
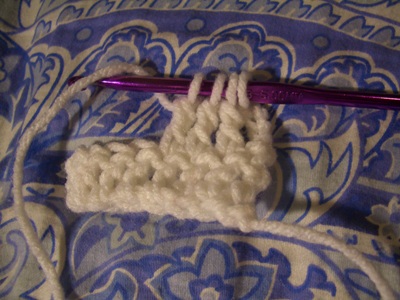
Tr4tog--treble or triple crochet 4 stitches tog--YO hook 2 times, insert hook in 1st st, YO, pull up a loop, YO, pull through 2 loops, YO, pull through 2 loops, 2 loops on hook, YO 2 times, insert hook in next st, YO, pull through 2 loops, YO, pull through 2 loops, 3 loops on hook, YO 2 times, insert hook in next st, YO, pull through 2 loops, YO, pull through 2 loops, 4 loops on hook, YO 2 times, insert hook in next st, YO, pull through 2 loops, YO, pull through 2 loops, 5 loops on hook, YO, pull through all loops on the hook.
1
 |
| YO hook 2 times |
2
 |
| Insert hook in 1st st, YO |
3
 |
| Pull up a loop, YO |
4
 |
| Pull through 2 loops, YO |
5
 |
| Pull through 2 loops, 2 loops on hook |
6
 |
| you have now made the bottom part of the 1st tr |
7
 |
| YO hook 2 times and continue as in previous photos |
8
 |
| 5 loops on the hook (the bottom part of 4 trs) |
9
 |
| YO hook |
10
 |
| pull through all loops on hook |
11
 |
| Tr4tog |
Tr5tog--treble or triple crochet 4 stitches tog--YO hook 2 times, insert hook in 1st st, YO, pull up a loop, YO, pull through 2 loops, YO, pull through 2 loops, 2 loops on hook, YO 2 times, insert hook in next st, YO, pull through 2 loops, YO, pull through 2 loops, 3 loops on hook, YO 2 times, insert hook in next st, YO, pull through 2 loops, YO, pull through 2 loops, 4 loops on hook, YO 2 times, insert hook in next st, YO, pull through 2 loops, YO, pull through 2 loops, 5 loops on hook, YO 2 times, insert hook in next st, YO, pull through 2 loops, YO, pull through 2 loops, 6 loops on hook, YO, pull through all loops on the hook.
Begins same as tr4tog (through image 7)
 |
| 5 bottom parts of trs on hook, 6 loops on hook |
 |
| YO hook |
 |
| pull through all loops on hook |
 |
| Tr5tog |
Tr3tog--treble or triple crochet 3 stitches together--YO hook 2 times, insert hook in 1st st, YO, pull up a loop, YO, pull through 2 loops, YO, pull through 2 loops, 2 loops on hook, YO 2 times, insert hook in next st, YO, pull through 2 loops, YO, pull through 2 loops, 3 loops on hook, YO 2 times, insert hook in next st, YO, pull through 2 loops, YO, pull through 2 loops, 4 loops on hook, YO hook, pull through all loops on hook.
 |
| 4 loops on hook, YO |
 |
| Pull through all loops on hook |
 |
| tr3tog |
Abbreviations
ch(s)--chain(s) dc(s)--double crochet(s) sl st--slip stitch sc(s) single crochet(s)
beg--beginning st(s)--stitch(es) Dc SPIKE--double crochet spike SPIKE--
spike stitch
dc3tog--double crochet 3 stitches together
dc4tog--double crochet 4 stitches together
Rnd(s)--round(s) tr4tog--treble or triple crochet 4 stitches together tr(s)--triple or treble crochet
hdc(s)--half double crochet(s)
dtr(s)--double treble or triple crochet
tr5tog--treble or triple crochet 4 stitches together sk--skip
sp--space tr3tog--treble or triple crochet 3 stitches together
Pattern
Rnd 1: With
white yarn, make a
magic circle, ch 3 (counts as 1st dc), 17 dcs in circle, fasten off. (18 dcs)
Rnd 2: Attach
black yarn in any dc, ch 1, sc in same st, sc in next to dcs, Dc SPIKE in magic circle, *sc in next 3 sts, dc spike in magic circle* 5 times, sc in last two dcs, sl st in beg sc. Fasten off. (18 scs, 6 dc spikes)
Rnd 3: Attach
white yarn in sc at fasten off, ch 1, sc in same st, 2 scs in next sc, *sc in next sc, 2 scs in next sc* 8 times, sl st in beg sc, fasten off. (27 scs) (
Don't sc in any of the dc spikes)
Rnd 4: Attach
black yarn in sc at fasten off
, ch 1, sc in same sc and next sc, 2 scs in next sc,
SPIKE in top of Dc SPIKE, 2 scs in next sc, sc in next 2 scs, 2 scs in next sc, SPIKE in top of Dc SPIKE, sc in next 2 scs, 2 scs in next sc, SPIKE in top of Dc SPIKE, sc in next 2 scs, 2 scs in next sc, sc in next sc, SPIKE in Dc SPIKE, sc in next sc, 2 scs in next sc, sc in next sc, SPIKE in top of Dc SPIKE, sc in next sc, 2 scs in next sc, sc in next 2 scs, SPIKE in top of Dc SPIKE, sc in same st as beg sc, fasten off. (36 scs)
Rnd 5: Attach
red yarn in top of Dc SPIKE in rnd 2, pull loop up to level of rnd 4, ch 8 *, SPIKE in SPIKE in previous rnd, ch 7* 5 times, sl st in beg ch. (5 SPIKEs)
Rnd 6: Ch 1, *do 8 scs in ch-7 sp, ch 1, sk to next ch-7 sp* 6 times, sl st in beg sc, fasten off.
Rnd 7: Attach
black yarn in sc at fasten off, ch 3,
dc3tog (in scs), ch 3, dc4tog (in scs), *ch 5, SPIKE in red SPIKE, ch 5,
dc4tog , ch 3, dc4tog* 5 times ch 5, sl st in beg ch 3, fasten off.
Rnd 8: Attach
white yarn in top of dc3tog, ch 1, sc in same st, do 3 SPIKEs in the red sc in between dc3tog and dc4tog, sc in top of dc4tog, *ch 3, SPIKE in black SPIKE, ch 3, sc in top of dc4tog, 3 SPIKEs in red sc in between 2 dc4togs , sc in top of next dc4tog, * 5 times, ch 3, SPIKE in black, ch 3, sl st in beg sc, fasten off.
 |
| SPIKE in red sc |
Rnd 9: Attach
black yarn in 1st sc of last rnd (at fasten off), ch 4, tr4tog (in scs), ch 6, SPIKE in white SPIKE, ch 6 *tr5tog in next group of scs, ch 6, SPIKE in white spike, ch 6* 5 times, sl st in top of tr4tog, sl st in top of beg ch 4.
You can sew the buttons on with embroidery thread at this point, or wait until the square is finished. I sewed the thread around through the holes instead of in an X to make them look more like eyes.
Rnd 10: Ch 4 (counts as 1st tr), (1 tr, 2 hdcs, 2 trs) all in same st, ch 9, *(2 trs, 2 hdcs, 2 trs) in top of tr5tog, ch 9* 5 times, sl st in top of beg ch 4. Fasten off.
Rnd 11: Attach red yarn in
ch-9 sp on right side of a fish tail, ch
8 (counts as dtr ch 3), dtr in same sp, tr in next 2 sts, dc in next 2 sts, hdc
in next 2 sts, 10 scs in
ch-9 sp, hdc in next 2 sts, dc in next 2 sts, tr in next 2 sts, (dtr, ch 3,
dtr,2 trs, 2 dcs, 2 hdcs, 2 scs) in ch-9 sp, sc in next 6 sts, (2 hdcs,2
dcs, 2 trs, dtr, ch 3, dtr, 2 trs) in ch-9 sp, dc in next 2 sts, hdc in next 2
sts, sc in next 2 sts, 10 scs in ch-9 sp, hdc in next 2 sts, dc in next 2
sts, tr in next 2 sts (dtr, ch 3, dtr, 2 trs, 2 dcs, 2 hdcs, 2 scs) in next st
ch-9 sp, sc in next 6 sts, (2 scs, 2 hdcs,2 dcs,2 trs) in ch-9 sp, sl st in 5th
ch of beg ch. Fasten off, weave in ends.
 |
| Attach red yarn in ch-9 sp |
Alternative for a Hexagonal Motif
Rnd
10: Ch 4 (counts as 1st tr), (1 tr, 2 hdcs, trs) all in same
st, tr again in same st, but don't do last YO and pull through, instead,
*change to Red yarn, for YO and pull through, then in next ch-6 sp,
do tr3tog and 4 trs, sk SPIKE, 4 trs and tr3tog in next ch-6 sp, changing
to black yarn before you finish the last YO and pull through,
(2 trs, 2 hdcs, tr) in top of tr4tog, start tr again in tr4tog, adding red
yarn on last YO, pull through* 5 times, (tr3tog, 4 trs in next ch-6
sp), sk SPIKE, (4 trs, tr3tog, changing to black yarn before
you finish the last YO and pull through) in last ch-6 sp, sl st in top of beg
ch 4. Fasten off and weave in ends.
Happy Hooking!
You May Also Like: