
Novice Sandy on Knitting Paradise found this absolutely adorable pattern for an
Amigurumi Yorkie. The only problem is the pattern is incomprehensible. I think it was originally written in Japanese and the translation is really bad. Fortunately, I have crocheted some amigurumi patterns using the Japanese chart method so I get what's going on here, so here is my translation. I did have to change a few things here and there, but I think it's pretty true to the original pattern.
Finished Size:
About 7 inches High x 5 inches Wide
Materials:
- Red Heart Super Saver Yarn, worsted weight, Warm Brown
- C or size 2 Hook, such as Clover Soft Touch 2.75-mm Crochet Hooks, Size C
- Stitch Marker
- Poly-fil Stuffing, such as Fairfield Poly-Fil Premium Polyester Fiber
- Embroidery Floss in light browns, beiges, dark yellows and black, such as DMC Prism Six-Strand Floss
- Red Heart Shimmer yarn , Black
- Lion Brand, Vanna's Glamour yarn , Topaz
- 2 round black shank buttons, such as Slimline Buttons Series 1-Black Shank 3/4"
- Tapestry Needle, such as Clover Gold Eye Tapestry, No. 18-22
Rnd--round ch(s)--chain(s) sc(s) single crochet(s) st(s)--stitch(es)
sc2tog--single crochet 2 stitches together
Head
Start with a magic circle
Rnd 1: Ch 1, 6 scs in circle (6scs)
From now on put a stitch marker in the first sc of each rnd.

Rnd 2: 2 scs in each sc (12 scs)
Rnd 3: 1 sc in sc, 2 scs in next sc (18 scs)
Rnd 4: 1 sc in next 2 scs, 2 scs in next sc (24 scs)
Rnd 5: 1 sc in next 3 scs, 2 scs in next sc (30 scs)
Rnd 6: 1 sc in next 4 scs, 2 scs in next sc (36 scs)
Rnd 7: 1 sc in next 5 scs, 2 scs in next sc (42 scs)
Rnd 8: 1 sc in each sc (42 scs)
Rnd 9: 1 sc in next 6 scs, 2 scs in next sc (48 scs)
Rnd 10-11: 1 sc in each sc (48 scs)
Now you start to decrease, continue putting stitch marker in first st of each rnd.
Rnd 12: 1 sc in next 5 scs, sc2tog in next sc (42 scs)
Rnd 13: 1 sc in each sc (42 scs)
Rnd 14: 1 sc in next 4 scs, sc2tog in next sc (36 scs)
Rnd 15: 1 sc in next 3 scs, sc2tog in next sc (30 scs)
Rnd 16: 1 sc in next 2 scs, sc2tog in next sc (24 scs)
Rnd 17-18: 1 sc in each sc (24 scs)
Start stuffing, but stuff loosely enough so you can shape the head.

Rnd 19: 1 sc in next sc, sc2tog (12 scs)
Rnd 20: 6 sc2togs, (6 scs)
Fasten off. Leave bottom open for sewing later. Shape head into an oval.

Body:
Start with a magic circle
Rnd 1: ch 1, 6 scs in circle (6 scs)
Rnd 2: 2 scs in each sc (12 scs)
Rnd 3: 1 sc in next sc, 2 scs in next sc (18 scs)
Rnd 4: 1 sc in next 2 scs, 2 scs in next sc (24 scs)
Rnd 5: 1 sc in next 3 scs, 2 scs in next sc (30 scs)
Rnd 6: 1 sc in next 4 scs, 2 scs in next sc (36 scs)
Rnd 7: 1 sc in each sc (36 scs)
Rnd 8: 1 sc in next 5 scs, 2 scs in next sc (42 scs)
Rnd 9: 1 sc in next 6 scs, 2 scs in next scs (48 scs)
Rnd 10-11: 1 sc in each sc (48 scs)
Start to decrease
Rnd 12: 1 sc in next 6 scs, sc2tog (42 scs)
Rnd 13: 1 sc in each sc (42 scs)
Rnd 14: 1 sc in next 5 scs, sc2tog (36 scs)
Rnd 15: 1 sc in each sc (36 scs)
Rnd 16: 1 sc in next 4 scs, sc2tog (30 scs)
Rnd 17: 1 scs in each sc (30 scs)
Rnd 18: 1 sc in next 3 scs, sc2tog (24 scs)
Rnd 19-26: 1 sc in each sc (24 scs)
Fasten off leaving a long tail for sewing later.
Stuff, but don't sew up the hole.
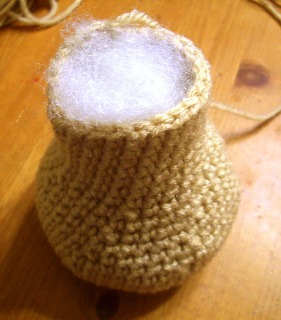
Front Legs:
Make 2
Make a magic circle
Rnd 1: ch 1, 6 scs in circle (6 scs)
Place a stitch marker in the first st of each rnd
Rnd 2: 2 scs per sc (12 scs)
Rnd 3: 1 sc in next sc, 2 scs in next sc (18 scs)
Rnd 4-5: 1 sc in each sc (18 scs)
Start decreasing
Rnd 6: 1 sc in next sc, sc2tog (12 scs)
Stuff foot.

Rnd 7: sc2tog, 1 sc in next 4 scs, sc2tog, 1 sc in next 4 scs (10 scs)
Rnd 8-22: 1 sc in each sc (10 scs)
Fasten off leaving a long tail for sewing in, stuff the leg near the foot, but not at the top.

Make 2
Make a magic circle
Rnd 1: ch 1, 8 scs in circle (8 scs)
Put a stitch marker in the first st of each row.
Rnd 2: 2 scs in each sc (16 scs)
Rnd 3: 1 sc in next sc, 2 scs in next sc (24 scs)
Rnd 4-5: 1 sc in each sc (24 scs)
Rnd 6: 1 sc in next sc, sc2tog (16 scs)
Rnd 7: sc2tog 3 times, sc in rest of scs (13 scs)
Rnd 8: sc2tog once, 1 sc in sc in rest of sts (12 scs)
Flatten right side on one leg and left side on the other leg. Partially stuff.
Rnd 9-13: 1 sc in each sc (12 scs)

Start stuffing the leg as you finish up.
Rnd 14: sc2tog, 1 sc in next sc (6 scs)
Rnd 15: sc2tog all the way around to close (3 scs)
Fasten off leaving a long tail for sewing.


Ears:
Make 2
Make a magic circle
Rnd 1: ch 1, 4 scs in circle (4 scs)
Put a stitch marker in the first st of each row.
Rnd 2: 1 sc per sc (4 scs)
Rnd 3: 2 scs per sc (8 scs)
Rnd 4: 1 sc per sc (8 scs)
Rnd 5: 1 sc in next sc, 2 scs in next sc (12 scs)
Rnd 6: 1 sc in each sc (12 scs)
Rnd 7: 2 scs in first sc, 1 sc in rest of scs (13 scs)
Rnd 8-10: 1 sc in each sc (13 scs)
Fasten off leaving a long tail for sewing later. Fold ear, don't stuff.


Make a magic circle
Rnd 1: ch 1, 5 scs in magic circle (5 scs)
Put a stitch marker in the first st of each row.
Rnd 2: 1 sc in each sc (5 scs)
Rnd 3: 2 scs in first sc, 1 sc in next, 2 scs in next sc, 1 sc in next 2 scs (7 scs)
Rnd 4-7: 1 sc in each sc (7 sc)
Rnd 8: *2 scs in first sc, 1 sc* 3 times, 1 sc in next 2 scs (10 scs)
Rnd 9-10: 1 sc in each sc (10 scs)
Fasten off leaving a tail for sewing in.

Muzzle:
Make a magic circle.
Rnd 1: ch 1, 6 scs in circle (6 scs)
Put a stitch marker in the first st of each row.
Rnd 2: 2 scs per sc (12 scs)
Rnd 3: 1 sc in each sc (12 scs)
Rnd 4: 1 sc in next sc, 2 scs in next sc (18 scs)
Rnd 5-7: 1 sc in each sc (18 scs)
Rnd 8: *2 scs in next sc* 4 times, sc in next 14 scs (22 scs)
Fasten off leaving long tail for sewing in. Stuff muzzle.

Finishing:

Sew muzzle to the head.


 |
| I tacked the legs down mid way to help the dog stand upright |

Sew the hind legs onto the body

Sew the tail onto the body


Weave in yarn ends.
Now start to attach embroidery floss and shimmer yarn. I used full strands. If you want to anchor the hair so it won't fall out, here is a good tutorial on how to do doll hair.

It helps to have a picture of a Yorkie. Here is a good photo or you can use the photo on the original pattern.

Embroider the nose.


I've had some questions about how to sew on the fur that is pulled up between the ears, so I'm adding this to help with this question.
Attach yarn at the bottom of the snout for the hair that is pulled up between the ears.

Once you have enough yarn attached, pull it up between the ears and use some attached yarn by the ears to tie the yarn up.


Sew some yarn at the base of the snout and pull it back between the ears and then tie it back. You can also use ribbon. Then sew on the buttons for the eyes.
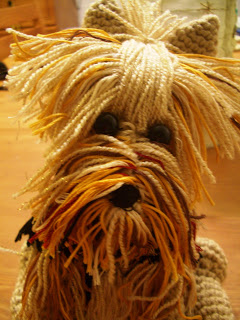
Here's how it looks from the back. The black fur is the black shimmer yarn.


YOU MAY ALSO LIKE:
 |
| Penguin Stocking |
 |
| Seahorse Applique |
 |
| Viking Helmet |


