Thursday, July 12, 2012

Penguin Flip Flops

My daughter loves penguins, so she asked me to make her some penguin flip flops for her trip to the beach.  So what I did was first make a mini penguin applique and sewed it onto the flip flops.  (The applique can be used for other projects as well.  I think it would be cute on a baby winter hat.)  Then I made the strap decorations and anchored them to the penguin and then sewed them onto the straps.

Here is the pattern I designed.  This is a relatively easy pattern once you understand how to do a magic circle.  I have detailed instructions in the pattern on how to make a magic circle, so don't be afraid to try it.

Materials:
  • Sport or baby weight yarn in purple (or black) and white
  • Worsted weight yarn in orange
  • Black embroidery thread
  • C-2(2.75mm) hook
  • Embroidery or tapestry needle with a large eye
  • Flip Flops 
Note: this pattern uses the Sc2tog (Single Crochet 2 stitches together) to do decreases.  There are detailed instructions on how to do this stitch when it appears in the pattern.  Insert hook in first sc, yo, draw up a loop, two loops on hook.  Insert hook in next sc, draw up a loop, 3 loops on hook.  Yo draw yarn through all three loops on hook, one sc2tog made.

Penguin Applique:

Backing: With PURPLE(or black) YARN begin with a magic circle (sometimes called a sliding ring or a sliding circle).  (Sorry my pictures start with white yarn, hope it doesn't confuse you.)

For video instructions on how to do a magic circle check out this video by Crochet Geek.


Start by making a loop and inserting your hook

YO hook

Ch 1

YO hook, pull up a loop


YO hook (hold on to magic circle with left hand)

pull up a loop

YO again and pull through two loops, first sc made
Rnd 1:  6 sc in magic circle. sl st in beginning sc, ch 1. (6 scs)


6 scs made

Start to pull in magic circle by pulling on short tail end, making sure not to squeeze the scs  so tightly you can't insert your hook

Before you tighten the circle all the way, insert hook in beginning sc

Sl st in beginning sc

Pull short end tail to make magic circle as tight as possible


now the center is nice and tight

Rnd 2:  Do 2 sc in each sc. ch 1.  (12 scs)

Row 1:  Do 3 scs, one per sc, ch 1, turn. (3 scs)
Row 2:  Do 2 scs in first sc (inc), then 1 sc in each sc, to end, 2scs in last sc, ch 1, turn (5 scs)
Row 3:  Repeat row 2 (7 scs)

what your applique should look like so far


Row 4:  Repeat row 2 (9 scs)

Row 5:  sc2tog (dec), 1 sc per sc, but one sc2tog in last sc, ch 1, turn (7 scs)

To do a sc2tog insert hook in first sc and pull up a loop, two loops on the hook

Then insert hook in next sc and pull up another loop, 3 loops on the hook

YO

draw yarn through all three loops on the hook

one sc2tog made

Row 6: repeat row 5 (5 scs)
Row 7: repeat row 5 (3scs). Fasten off.


Face

Magic Circle
Rnd 1:  5 scs in circle, sl st in beginning sc, ch 1 (5scs)

Rnd 2:  2 scs in each sc, sl st in beginning sc. Fasten off.  Leave tail for sewing (10 scs)

Body

Magic Circle
Rnd 1:  5 scs in circle, sl st in beginning sc, ch 1 (5 scs)

Rnd 2: 2 scs per sc for 3 scs (6 scs), then sl st around in each sc til you reach the first sc made in this rnd.  (3 sl sts), ch 1.

Rnd 3:  skip 1st sc, 2 scs in each of next 3 scs (6 scs). Sl st in next st, fasten off. Leave tail for sewing.

Now you are ready to put the applique together.  Start by sewing the face and body to the backing.
The face and body should look like this on the backing

whip stitch the face on to the backing

whip stitch the body onto the backing, sewing a few extra stitches between the face and the body


weave in the ends

Making the Beak and Feet

Sew a french knot in the middle of the face for a beak.
Thread the needle with the orange yarn and tie a knot in the end.  For instructions on an easier way to thread the needle, check out the end of the pattern

run the needle through the back of the applique in the middle of the face

Wrap the yarn twice around the needle and then run it back through the front of the face near wear you first pulled the orange yarn through.  Make sure the yarn is wrapped fairly tightly around the needle.

Beak made
Sew on the feet using french knots and sewing around the knots.

Weave the orange yarn through the back of the applique and put it in position for the first foot

make a french knot again, but this time wrap the yarn once around the needle

after making the knot, pull the yarn through again on one side of the knot

bring the needle around the back of the applique and pull it through again on the other side of the knot

once the yarn is pulled all the way through put the needle through the loop formed with the orange yarn

weave the yarn through the back of the applique to form the other foot

repeat what you did with the first foot, leaving a yarn tail to use for sewing the applique onto the flip flop
Sew french knots in black embroidery thread on the face for the eyes.


Next, sew the applique onto the flip flop.

Here's an easier way to thread the needle with worsted weight yarn
Unroll the yarn

Press it flat around the eye of the needle

slide the flattened yarn off the needle, keeping it flat, then push it through the eye


Sew the applique onto the flip flop.


Strap Decorations

Base (Make 2, one for each strap, base and other circles)
Start with a magic circle
Rnd 1:  6 scs in magic circle, sl st in first sc, ch 1 (6 scs)
Rnd 2:  2 scs per sc, sl st in first sc made (12 scs), ch 23 or as many needed to fit the length of the strap.  fasten off leaving a tail for sewing.


Make 5 more circles (3 purple (black), 2 white), like the first one, but omit the ch 23.  Instead fasten off, leaving a tail for sewing.


Sew the other circles onto the base circle, alternating colors.


weave the thread through to the end of the circle

Now it is ready to sew onto the strap
 Sew the circle piece onto the strap.


use the tails to secure each circle onto the strap

First attach the top circle to the penguin applique to anchor it


then secure the circle onto the strap
Secure each circle then weave in ends

Hope you enjoy the pattern.  I'd love to see pictures of what you've done with it.

Abbreviations

sc(s)--single crochet(s)
sl st(s)--slip stitch(s)
ch--chain
sc2tog--single crochet 2 stitches together

Wednesday, July 11, 2012

Free Beginner Pattern-Bookmark For Dad


Bookmark for Dad    
        
Materials
·         H/8 Hook (5 mm)
·         Red Heart Soft Worsted Weight Yarn (2 colors or variegated)
·         Tapestry needle
Gauge:  Gauge isn’t important, you can make the bookmark as long as you like, the measurements in the pattern are just a suggestion (4 inches = 11 rows; 1” = 4 hdc .)
Pattern
Ch 45. 
Row 1:  Hdc in 3rd ch from hook.
1. YO insert hook in 3rd ch from hook
2. YO hook again

3. Pull up a loop


4. YO hook again, pull through 3 loops on hook


Make 5 more hdc (one per ch) leaving a long ch for a tail. (6 hdc)
YO hook, insert hook in next ch

6 hdcs made


Row 2:  Ch 2, turn.  Hdc in first hdc and each hdc to the end of the row. 
Repeat Row 2, 2 more times, but don’t finish last hdc on the fourth row.  Change color.
1. don't finish hdc


2. instead of YO with same yarn start with new color


3. new color added in


Row 5: Ch 2, turn, hdc in each st across, working tail of new color under sts to secure.  Cut of yarn of first color leving a tail long enough to weave in. (6 hdc)
work tails in under stitches


Repeat Row 5 until hdc portion of bookmark is about 7 inches long (about 18 rows altogether.)
Fasten off.  Weave in ends.


 Abbreviations
 Ch—chain
         Hdc—half double crochet
 Yo—yarn over
St(s)—stitch(es)
  Sp—space


You May Also Like:
Tutorials
One-Skein Maze Scarf

Friday, July 6, 2012

Baby Rattle/Cat Toy Pattern


Baby Rattle/Cat Toy


Materials:

  • ·         H/8 hook  (5.00mm)
  • ·         Soft worsted weight acrylic yarn such as Bernat Satin, Caron Super Soft or Red Heart Soft Yarn.
  • ·         Two large jingle bells 
  • ·         Poly-Fil  polyester fiberfill


Notes:  Using acrylic yarn will make the rattle washable and it won’t shrink. This project can also be a cat toy, just add cat nip and use a sturdy yarn such as Red Heart Super Saver.
Gauge:  Gauge is not important to this pattern, but 32 rows is about 7 inches long.
Pattern :
Ch 11. 
Row 1:  Sc in second ch from hook and in each ch to the end.  (10 sc)

Diagrams courtesy of the Craft Yarn Council.

2nd Ch from hook


Wrap yarn over (yo) hook and pull through two loops on hook
First stitch made, insert hook into next ch


Row 2:  Ch 1, turn. 

1. Ch 1, then turn piece to look like picture 2


Sc in first sc,


2. Insert hook here for 1st stitch on second row, notice that piece
is facing the opposite direction.


and in every sc across row. (10 sc)


Repeat Row 2 until project is about 7 inches long, about 32 rows altogether.
Fasten off leaving a tail about 25 to 30 inches long.

Fold the fabric you have made in half.

Match up the sides and begin to sew the edges together using the overcast stitch.  Start at the short end using the long tail for sewing.
            
Continue sewing down the first long end.  When you reach the folded edge, weave the yarn through the rattle to the open long end. 

Stuff the rattle half full, add bells side by side.  Add more stuffing on top.  Continue to stitch sides together adding more stuffing as you go.  When you reach the end weave the yarn half way back down the side you just sewed up.

 Then stitch back and forth through both sides, making sure there is one bell on each side.  This will make the rattle easier to hold.

            
 Weave in ends.


Abbreviations
Ch—Chain
Sc—Single Crochet
yo--yarn over

You May Also Like:


Skull iPad Case


Bookmark For Dad
Add caption

Tuesday, July 3, 2012

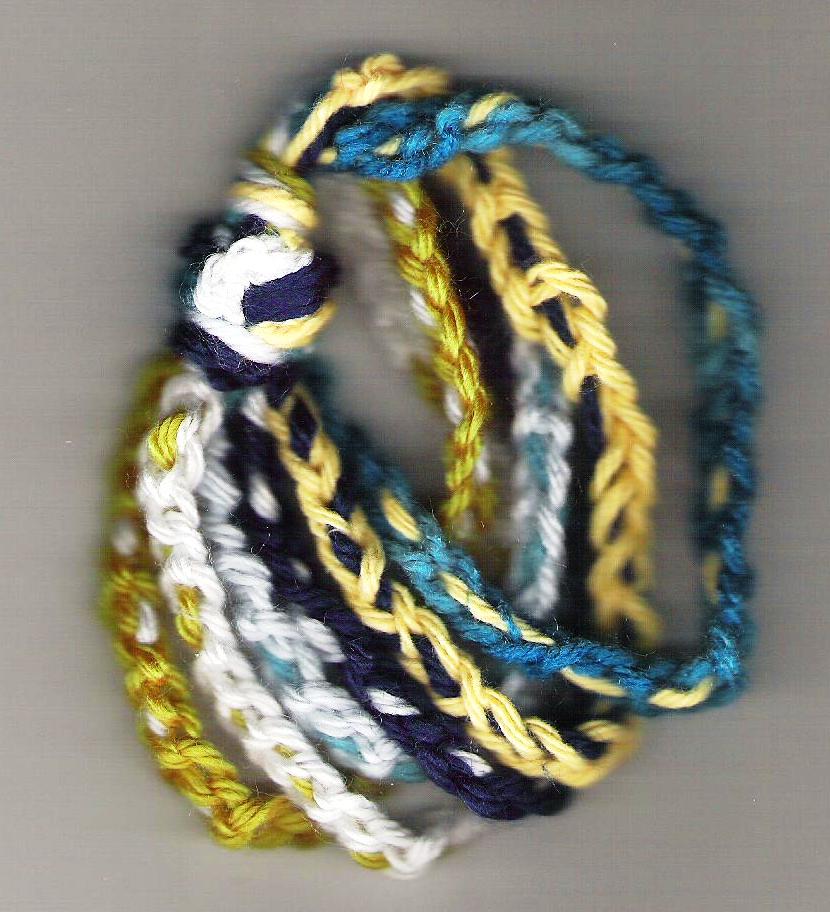
Free Pattern: Chain Stitch Bangle Bracelet


Here is an easy pattern I developed to practice the chain stitch.

Chain Stitch Bangle Bracelet

Materials

  • ·         J hook (6mm)
  • ·         Bernat Satin,  Caron Simply Soft, Red Heart Super Saver, or Lily Sugar n’Cream Cotton Worsted Weight Yarn , multiple colors if desired
  • ·         Needle with a large eye

Guage is not important to this pattern


Pattern
Make a slip knot and attach your hook. Start to ch.


 Ch until the length of the chain is long enough to go over your hand and around your wrist.

Fasten off by cutting a tail about as long as the chain plus 3 inches and then putting through the loop at the end of the chain and pulling tight to form a knot.

Make as many chains as you wish.  Some can be longer than others.

To attach the chains
Line up the chains side-by-side and tie a knot in each end


Thread a needle with one of the long strands and run it in and out through a chain of a contrasting color.


At the other end pull the yarn through the knot then through the knot on the other end of the chains, making sure not to pull too tight so that the chain gets shortened.

Then pull yarn through the knot.  This will help to secure the bracelet.  Continue to weave contrasting yarn through the rest of the chains.  Then weave the short ends into the knots to secure the bracelet.  Cut off the loose ends.


Abbreviations
Ch(s)-chain(s) stitch

YOU MAY ALSO LIKE:
Crochet Jewelry

Bookmark For Dad

Baby Rattle/Cat Toy


Warm Up America + $5.00 Yarn Night

Well, the knitting teacher (Stephanie) and I just came into a huge yarn stash and we decided to do something for the community with it, so we are going to participate in Warm Up America.  This great charity is sponsored by both Michaels and the Craft Yarn Council, where we teachers receive our certifications.


What is Warm Up America! (WUA!)
The charity that has warmed peoples' lives since 1991. It started in a small Wisconsin town with neighbors knitting and crocheting afghans for neighbors in need. Thanks to the creativity of founder Evie Rosen who came up with the idea of having volunteers knit or crochet small sections and then others join them together, the idea quickly caught on. Today Warm Up America distributes warm afghans, caps and other items to tens of thousands of people, thanks to the generosity of knitters and crocheters around the country.  The blankets and caps we make will stay in our community and now is a perfect time to start so they will be ready for winter.  Here's their brochure.

If you don't have a current project you're working on for $5.00 Yarn Night, this would be a great thing to work on.  We will have tons of yarn for you to work with and patterns.  You can make newborn caps or afghans. Here's an advance look at basic patterns for the afghans.  


WUA Crochet and Knit Patterns


Following are basic crochet and knit patterns for making individual Warm Up America! afghan sections. Remember, if you want to make an entire afghan, you can knit or crochet your afghan to any size or pattern you wish. You'll find helpful hints on assembling Warm Up America! afghans on another page at this site.

Tip!
To crochet or knit "perfect" Warm Up America! sections, cut a 7" by 9" cardboard template. Use the template as a guide; it's easier to handle than a measuring tape and great for kids.


BASIC CROCHET SECTION PATTERNS
Materials: Worsted-weight acrylic yarns
Gauge: 9 stitches = 2 inches
Finished size: 7" by 9"
Hook: Size G crochet hook or size necessary to obtain gauge

BASIC SINGLE CROCHET
Chain 30 for the foundation chain.
Row 1: Single crochet in 2nd chain from hook, and in every chain in the foundation row. Chain 1 and turn your work.
Row 2: Working under the 2 top loops of each stitch in the previous row, single crochet across the row. Chain 1 and turn.
Repeat Row 2 until piece measures 9".
Fasten off.

BASIC DOUBLE CROCHET
Chain 27 for the foundation chain.
Row 1: Double crochet in 3rd chain from hook and in each chain of the foundation row. Chain 2 and turn your work.
Row 2: Double crochet in each stitch across the row. Chain 2 and turn.
Repeat Row 2 until piece measures 9".
Fasten off.

SHELL STITCH
Chain 31 for the foundation chain. (This stitch requires multiples of 6 chains plus 1.)
Row 1: Work 3 double crochets in the 4th chain from the hook. *Skip 2 chains. Single crochet in the next chain. Skip 2 chains, then work 5 double crochets in the next chain.* (You've created your first shell.) Repeat the sequence of stitches between the asterisks (*) across the row, ending with skipping 2 chains and 1 single crochet in the last chain. Chain 3 and turn your work.
Row 2: Work 3 double crochets in the 1st single crochet. *Work 1 single crochet in the center double crochet of the next shell, work 1 shell of 5 double crochets in the next single crochet.* Repeat the sequence of stitches between the asterisks (*). End with 1 single crochet on top of the turning chain. Chain 3 and turn your work.
Repeat Row 2 until piece measures 9".
Fasten off.

FLYING "V's"
Chain 33 for the foundation chain.
Row 1: Double crochet, chain 2 and single crochet in the 4th chain from the hook. *Skip 2 chains, then work 2 double crochets, chain 2 and single crochet in the next chain.* Repeat the sequence between the asterisks across the row, ending with 1 double crochet in the last chain. Chain 2 and turn.
Row 2: Work 2 double crochets, chain 2 and then work 1 single crochet stitch in the first chain 2 space of the previous row and in each chain 2 space across the row, ending with 1 double crochet in the last chain. Chain 2 and turn.
Repeat Row 2 until piece measures 9".
Fasten off.

LITTLE SCALLOPS
Chain 33 for the foundation chain.
Row 1: Skip 2 chains, and double crochet into next chain. *Skip 2 chains and work 1 single crochet and 2 double crochets into the next chain.* Repeat the sequence of stitches between the asterisks until the last 3 chains. Skip 2 chains and single crochet into the last chain. Chain 1 and turn.
Row 2: Work 2 double crochets into the first stitch. *Skip 2 double crochets, then work a single crochet and 2 double crochets into the next single crochet.* Repeat the sequence between the asterisks until the last 3 stitches. Skip 2 double crochets and single crochet into the top of the turning chain. Chain 1 and turn.
Repeat Row 2 until piece measures 9".
Fasten off.

ALTERNATING HALF DOUBLE CROCHETS
Chain 31 for the foundation chain.
Row 1: Half double crochet into the 3rd chain from the hook, and into each chain across the row. Chain 2 and turn.
Row 2: Skip 1 stitch. *Work 1 half double in the back loop of the next stitch and 1 half double in the front loop of the next stitch.* Repeat the sequence between the asterisks, ending with 1 half double worked into the top of the turning chain. Chain 2 and turn. Repeat Row 2 until piece measures 9".
Fasten off.

BASIC KNIT SECTION PATTERNS
Knitting Patterns Materials:
Worsted-weight acrylic yarns

Gauge: 5 stitches = 1 inch
Finished size: 7" by 9" Needle size: 7 needles or size necessary to obtain gauge

GARTER STITCH
Cast on 35 stitches.
Knit every row until piece measures 9".
Bind off.

STOCKINETTE STITCH
Cast on 35 stitches.
Row 1: Knit all stitches.

Row 2: Purl all stitches.
Repeat these 2 rows until piece measures 9".
Bind off.

SEED STITCH
Cast on 35 stitches.
Row 1: Knit 1 stitch, purl the next stitch, knit the next. Continue alternating stitches across the row.
Repeat this row until piece measures 9".
Bind off.

DOUBLE SEED STITCH
Cast on 35 stitches.
Row 1: Knit 1 stitch, purl the next stitch, knit the next. Continue alternating stitches across the row.
Row 2: Purl 1, knit 1, purl 1, alternating stitches across the row.
Row 3: Work the same as Row 2.
Row 4: Work the same as Row 1.
Repeat these 4 rows until piece measures 9".
Bind off.

LINES
Cast on 35 stitches.
Row 1: Knit all stitches.
Row 2: Purl all stitches.
Row 3: Knit all stitches.
Row 4: Purl all stitches.
Row 5: Knit all stitches.
Row 6: Knit all stitches.
Repeat these 6 rows until the piece measures 9".
Bind off.

CABLE
Cast on 36 stitches.
Row 1: Purl 13 stitches, knit next 2 stitches, purl next 6, knit 2, and purl remaining 13 stitches.
Row 2: Knit 13 stitches, purl 2, knit 6, purl 2, and knit 13.
Row 3: Repeat Row 1.
Row 4: Knit 13 stitches, purl 2. Slip next 3 stitches onto cable needle, hold in back of work. Knit next 3 stitches, then knit the 3 stitches from the cable needle. Purl 2 and knit the remaining 13.
Row 5: Repeat Row 1.
Row 6: Repeat Row 2.
Row 7: Repeat Row 1.
Row 8: Repeat Row 2.
Repeat these 8 rows for 9".
Bind off in pattern.

SQUARES
Cast on 35 stitches.
Row 1: Knit 5 stitches, purl 5, knit 5. Alternate knitting 5 and purling 5 stitches across the row.
Row 2: Purl 5 stitches, knit 5, purl 5 and repeat pattern across the row.
Row 3: Repeat Row 1.
Row 4: Repeat Row 2.
Row 5: Repeat Row 1.
Row 6: Repeat Row 2.
Row 7: Repeat Row 2.
Row 8: Repeat Row 1.
Row 9: Repeat Row 2.
Row 10: Repeat Row 1.
Row 11: Repeat Row 2.
Row 12: Repeat Row 1.
Repeat these 12 rows until piece measures 9".
Bind off in pattern.

SHADOW TRIANGLES
Work in multiples of 5 stitches.
Cast on 35 stitches.
Row 1: Knit all stitches.
Row 2: *Knit 1, Purl 4, repeat from * to across the row.
Row 3: *Knit 3, Purl 2, repeat from * to across the row.
Row 4: Work the same as Row 3.
Row 5: Work the same as Row 2.
Row 6: Knit all stitches.
Bind off in pattern.

You May Also Like:

Tutorials
Pineapple Wedding Veil
Amigurumi Penguin Stocking