Top Chart
 |
| Bottom Chart |
I'm going to try something a little different with this post. It's going to be a Crochet Along. If you would like to do it with me email me at crochetparfaitpg@yahoo.com and I will send you the charts. Let me know which format you would like it in (Excel--editable, Adobe pdf--print it out and tape it together, or Png--picture)
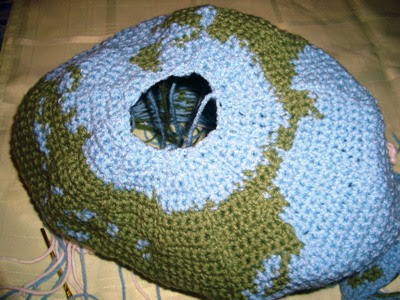
The following instructions are for crochet, but you can also knit this chart. Check out Miaou's Globe. You can find here comments about the pattern here.
I suggest you read the whole post before starting.
Materials
- Worsted weight yarn, blue, green and white
- H Hook
- Polyfil stuffing
- Tapestry needle
Abbreviations
ch(s)--chain(s) sc(s)--single crochet(s) st(s)--stitch(es) YO--Yarn over
This is how to start the chart and change color.
I'm starting with the top chart.
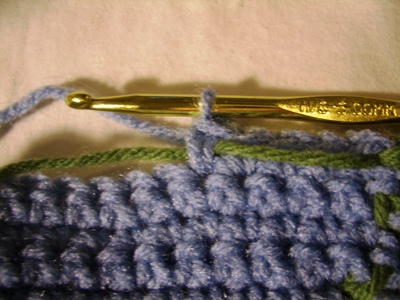
With an H hook and Blue yarn I chained 122 chs. That is one more than the number of stitches for the chart which is 121. You will be crocheting right to left if you are a right hander (left to right for lefties) so look at the bottom of the top chart on the right hand side. You will start by inserting the hook in the second ch from the hook and doing 12 scs in Blue Yarn, start the next sc. (insert hook, YO, pull up a loop)
If you are crocheting right handed this first row will be on the wrong side of your piece so you will carry the yarn on this side, pull the Blue Yarn to this side. (If you are a lefty you will be on the right side so carry the yarn on the back of this row).
Loop the Green Yarn over the hook and pull it through the two loops.
Then do 3 scs, start the next sc and add the Blue Yarn the same way you added the Green yarn. Since there is only one Blue sc, you will just start the sc and then add the Green Yarn.
Keep following the chart in this manner. It's a good idea to count the number of squares for each color change before you start it. Always do one less full sc and then start the sc on the last st before the color change.
Carry the yarn on the wrong side about every 5 stitches when you aren't using it.
You do this by catching the unused yarn under a stitch.
This is how to read the chart. (I'm only going to do this for the first 2 rows, if you need to write it out this will be your guide)
Right Handers
With Blue Yarn Ch 122. (start at the bottom right hand side of the top chart and start reading toward the left side of the chart )
Row 1: Insert hook in 2nd ch from hook, do 12 scs, start next sc, add Green Yarn, do 3 scs, start next sc, add Blue Yarn, start sc, add Green Yarn, do 5 scs, start next sc, add Blue Yarn, start sc, add Green Yarn, start sc, add Blue Yarn, do 17 scs, start next sc add Green Yarn, do 11 scs, start next sc, add Blue Yarn, do 18 scs, start next sc add Green Yarn, do 12 scs, start next sc, add Blue Yarn, sc to end of ch, ch 1. Turn (121 scs)
Now you are following the chart from left to right
Row 2: Sc in same st and in next 31 sts, start next sc add Green Yarn, do 10 scs, start next sc, add Blue Yarn, do 19 scs, start next sc add Green Yarn, do 11 scs, start next sc, add Blue Yarn, do 16 scs, start next sc, add Green Yarn, do 1 sc, start next sc, add Blue Yarn, do 1 sc, start next scs, add Green Yarn, do 2 scs, start next sc, add Blue Yarn, sc to end of row, ch 1. Turn (121 scs)
You will read Row 3 right to left and then Row 4 left to right and so on.
Left Handers
With Blue Yarn Ch 122. (start at the bottom left hand side of the top chart and start reading toward the right side of the chart )
Row 1: Insert hook in 2nd ch from hook, do 31 scs, start next sc, add Green Yarn, do 12 scs, start next sc, add Blue Yarn, do 18 scs, start next sc, add Green Yarn, do 11 scs, start next sc, add Blue Yarn, do 17 scs, start next sc, add Green Yarn, start sc, add Blue Yarn, start sc, add Green Yarn, do 5 scs, start next sc, add Blue Yarn, start sc, add Green Yarn, do 4 scs, start next sc, add Blue Yarn, sc to end of ch, ch 1. Turn. (121 scs)
Now you are following the chart from right to left
Row 2: Sc in same st, sc in next 19 scs, start next sc, add Green Yarn, do 2 scs, start next sc, add Blue Yarn, do 1 sc, start next sc, add Green Yarn, do 1 sc, start next sc, add Blue Yarn, do 16 scs, start next sc, add Green Yarn, do 11 scs, start next sc, add Blue Yarn, do 19 scs, start next sc, add Green Yarn, do 10 scs, start next sc, add Blue Yarn, sc to end of row, ch 1. Turn. (121 scs)
You will read Row 3 left to right and then Row 4 right to left and so on.
Continue on up to row 12. My next post will address how to do the rows after that. (I cut the picture into pieces so you can see it better.)
Happy Hooking!
You May Also Like: