Wednesday, January 23, 2013

Harley Davidson Afghan Chart


THIS PATTERN IS NOW DOWNLOADABLE ON MY NEW FACEBOOK GROUP PAGE.  YOU CAN FIND IT HERE.  JUST GO TO THE FILES TAB TO DOWNLOAD.

I recently got this comment:

"Do you do charts for crochet?? I am a recent follower, and I ask because my nephew has asked me to find a pattern for an afghan he wants. I haven't looked around, have no idea where to start, but he wants one with the Harley-Davidson logo across the top half and with flames coming up from the bottom half. Sound like anything you would be able to do? Or do you have any suggestion where I should look?? Thanks for your help."  Darlene

I love a good challenge, so here's my rendition:

I realize there's no way you could crochet this afghan from this tiny picture, so if you want the chart email me at crochetparfaitpg@yahoo.com.  Let me know what format you want it in.  (Excel--editable .xlsx, Adobe .pdf or picture .png,  I recommend the .xlsx or .png files because the pdf splits it up into several pages.)

Read further for more information on how to do Tapestry crochet.  I have a new tutorial on how to read a chart where I spell it out more clearly.  You can find it here

I've just uploaded a video on how to read the chart, how to change colors, how to carry yarn and how to use yarn bobbins. I'm only crocheting a middle section of the chart.  You will start at the edges of the chart to complete it.

Here is a tutorial on how to cross stitch on tapestry crochet


Update, here is a finished version of the afghan by Penny Jones.

Each square on the pattern counts as a single crochet.  It has 147 stitches across and 176 rows. The gauge of the pattern totally depends on the size yarn and hook you use.  I measured my gauge for worsted weight yarn and an I hook at 4 sts and 4 rows = 1".  With this gauge the afghan would measure 36"x44".  If you want to make it wider or longer, I'd add black stitches on either side of the pattern for width or more rows to the top and bottom of the pattern to make it longer.  I don't knit, but I think you could use this for a knitted afghan as well.

I've had several people ask me how much yarn to use so I estimate that it will take 500 yd skeins of worsted weight yarn (I recommend Red Heart Super Saver or Red Heart Super Saver Economy ), 3 each in black and orange and 1 each in yellow, red and white.  As Andrea pointed out, carrying the yarn will make it so you will need more yarn.  This is just an estimate, I haven't actually made the afghan yet.

I Just got some tips from Marsha, who made this intricate afghan.

I've crocheted several blankets from grids and when you are working with several colors, the best piece of advice I have is to find a large flat surface or table that you can spread out on. It keeps the yarn from getting tangled and when you start a new row, you just walk around to the other side of the table. That way you don't have to shift all those balls of yarn.

I usually make up several small- to medium-sized balls of yarn from the main skein if a color is repeated at several intervals across the work, but there are other colors in between. To keep the balls from unraveling, I place them in sandwich size ziplock bags. However, if I'm going back and forth with a couple colors every few stitches, I just carry the opposing color strand through and crochet over it as I would if I were changing yarn in the middle of a row and hiding the tail. This does tend to make the project a little thicker, however, so you have to be selective about where you apply this technique. 


A tip from Janice about how to do Tapestry Crochet:
"Chart Afghans are my favorite type of afghan to make. I have made several. One trick I have learned over the years is to thread your yarn from the bobbins in a straw before you start your stitch this keeps the bobbins from tangling. I never used a table to crochet/knit/Tunisian Afghans I always sit in my rocker so I am not sure what method is being used here. Also to keep the back as neat as possible I don’t carry the yarn I use different bobbins for each color and then weave the ends into the afghan. I keep track of the right side and wrong side to hang the bobbins on the wrong side never on the right side. An easy way to keep track is the odd rows are the wrong side and the even rows are the right side or vice versa which ever you prefer as I turn with each row I do not end and start over."


Here's a tip from Kelly on dealing with all the yarn:
"I am in the process of making this blanket, lemme tell you, you need a long table, at least 20 bobbins (to hold your strings). I'm needing at the moment 19..Annies sells them 6 to a pack..when you need to carry make sure the color your using is laying closest to your body and the color you are dropping at the moment is behind..don't carry farther then 4 and most importantly, well for me anyways DO NOT TURN BLANKET end with black every row." 

Here are Kelly's afghans in progress:

Double Crochet

"I'm not a fan of this method and heres the reasons,  uses a lot of yarn, a lot of bobbins, you can see unused thread from right side and the work isn't tight. Since I started one in the afghan stitch using the extra long J hook , I honestly don't want to go back to the double crochet method."


Afghan stitch

"the afghan stitch is tight, uniform, no mess with bobbins, thicker, and I'm lovin' this because I can rock in my chair instead of leaning over a table..you can hide the extra yarn in the back as well."


If you would like to ask Kelly about making the afghan in afghan stitch you can reach her here.

Here is a video of Kelly showing how to do color changes in afghan stitch.

This is a picture of the finished afghan in Afghan Stitch by Doris.

Here is a tutorial video by Crochet Geek on how to do the afghan stitch. 

If you have any questions for Kelly, post them in the comments below.  As soon as Kelly gets her blog up I will post the link.


Here is my version in single crochet:

I'm finding the best way to keep the integrity of the design is to crochet each row in the same direction.  That means I have to cut the yarn at the end of the row (I'm crocheting right to left since I'm right handed) and then join it again on the next row at the beginning of the row.  I start on the right with the black yarn then add each color as it comes up in the design and then drop those colors as they end in the design ending with the black yarn at the end of the row and tying off.    I've decided that I'm not happy with method and have changed course, you can read about it here.


If you are really talented (and somewhat ambidextrous) you can switch the hook to your left hand when you get to the end of the row and then crochet back the way you came like Carol Ventura does.  If you aren't ambidextrous, try this tutorial from Interweave.

This is another video tutorial by Red Heart Yarn.

If you are new to crochet charts check out my Skull iPad Case pattern below, it has a tutorial on how to read a chart.  If you would rather cross stitch the details of the chart, I would crochet the major black and orange areas and then you can have a look at my Day of the Dead Banner (also below) pattern for a tutorial on how to cross stitch on single crochet. 


Happy Hooking!

You May Also Like:


     Skull iPad Case
Day of the Dead Banner

Chicago Blackhawk Afghan


Friday, January 18, 2013

I'm Crocheting as Fast as I Can!

I'm kind of an instant gratification crocheter.  I like to do projects that don't take a long time, so afghans aren't really my thing.  But when I went to our church craft sale, one of the ladies was selling a small quilt that when folded up became a pillow.  She called it a "Quillow".  So I thought, that would be a great idea for an afghan, but I'm going to call it a "Pillowghan".

It's taking me a while to do the afghan part and as soon as I get it done I'll put up the pattern, so here is a preview.

The afghan itself is pretty simple, just double crochets.

This Pattern is Now Available Here.

So once it's finished, I will fold it up.


And put a decorative pillow top on it.


The pillow top isn't quite finished, I'm going to put a decorative edging on it in blue. 

You May Also Like:

                              
                                             Seahorse Applique
Turbanesque Headband


Falling Leaves Ripple Cowl

Sunday, January 13, 2013

An Invitation to My Followers

Hey, I've noticed that my following members has grown to 23, YIPEE!

I just wanted to let y'all know that if you have ever wanted to find a pattern that looked a certain way or did a certain thing, let me know and I will design it and put it up here on the blog.  You can comment on this post, or on any of the posts.  I'm always looking for INSPIRATION!


Friday, January 11, 2013

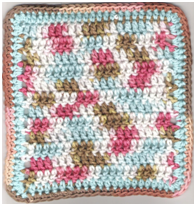
Beginner Washcloth


Materials
  • ·         Lily’s Sugar n’Cream Cotton Yarn, two to three colors
  • ·         H hook (5 mm)
  • ·         Tapestry Needle for weaving in ends


Guage:  14 dc = 4 inches; 7 rows= 4 inches

Notes:  The hdc and sc border are not necessary to the project, but add a decorative edge.

Abbreviations:
Ch—Chain                           Hdc—Half Double Crochet
Dc—Double Crochet           Sc—Single Crochet
St(s)—stitch(es)                  Sl st—slip stitch


Pattern:
Ch 25.
Row 1:  Dc in 4th ch from hook . 


Dc in each ch across to the end (22 dc plus first 3 chs count as one dc).

Row 2: Ch 3, turn. (counts as first Dc).  Dc in second st and in each st across with last dc in top of turning  ch. (23 dc.)
Diagrams courtesy of Craft Yarn Council


Repeat Row 2 until cloth measures about 7 in x7 in or 12 rows high.  Fasten off.

Round 1:  Change color, ch 2, turn (counts as first hdc.) Hdc in second dc and in each dc to end(working tails of yarn under stitches and cutting tails after they are under about 7 stitches.


Turn cloth and continue with hdc on sides of rows putting two hdc in the last dc of each row.


 3 hdc in 4th ch of foundation ch.

Turn cloth, 1 hdc in each ch of foundation ch across to end.

3 hdc in last ch of foundation ch.  Turn cloth, 2 hdc in each st at end of row to end.

3 hdc in first of 2 chs made in the beginning of the hdc round.


 Sl st into top of first Hdc.  Fasten off.


Round 2:  Change color if desired.  Ch 1, do not turn.  1 sc into hdc where you changed color and one sc in each hdc around turning the cloth as you go, working tails in under sts.  Sl st in beginning sc.  Fasten off.  Weave in ends.      


You May Also Like:

    
Fascinator Hat
Skull iPad Case
Chain Stitch Bangle Bracelet


Wednesday, January 9, 2013

Scrap Heart Fingerless Gloves


Here's the Scrap Heart Fingerless Gloves pattern I was working on.  Hope you like it.

Materials

Worsted Weight Yarn in White, Pink and Red,  such as Caron Simply Soft Brites yarn
G Hook, such as Clover Soft Touch 4.0-mm Crochet Hooks, Size G
Stitch Markers (I used safety pins)
Tapestry Needle

Gauge
SHELL plus 2 chs (pattern repeat) = 1",  4 rows (SHELL row, dc row 2 times) = 1 1/4"
4 row of ribbing = 1", 10 scs = 2 "

Special Stitches

SHELL--Do 2 double crochets (dcs) in same stitch(st), chain (ch) 1, do 2 more dcs in same st.


BLO--Back Loop Only--attach the yarn only in the back loop of the stitch


Abbreviations

Ch(s)--chain(s)     sc(s)--single crochet(s)  BLO--Back Loop Only
st(s)--stitch(es)     sl st--slip stitch              dc(s)--double crochet(s)
sk--skip               beg--beginning              sc2tog--single crochet 2 together


Sizing

This glove is made for a medium sized wrist and hand.

The heart pattern repeats every 5 sts.  If you need to increase the size of the glove and 5 sts is too much, you could add on one extra st on each side (along the thumb and the pinky) of the glove and do an extra dc (3 dcs instead of 2), also add one ch on each side.  If you need to decrease, you can try decreasing by one st on each side.  You would do the corresponding number of rib rows to the number of stitches you decide to do.  You would also need to adjust the thumb.

Here's a tutorial from Keeping Things Simple on how to measure you hands to get a custom fit.

Ribbing
With G hook and White Yarn, ch 11
Row 1:  Sc in second ch from hook and across (10 scs)
Row 2: Ch 1 turn, sc in BLO of first st and in each st across (10 scs)
Row 3 to 30:  Repeat Row 2. (10 scs per row) Fasten off leaving a long tail.  Weave ends together to form a cuff.


Body of Glove
Rnd 1:  Join white yarn in top of cuff, do 1 sc in side of each row, sl st in beg sc, fasten off. (30 scs)


Rnd 2: With Pink Yarn insert hook in sc above where you stitched the cuff together, ch 3, dc in same st, *ch 2, sk 4 sts, do SHELL in next st* repeat 5 times, ch 2 then do last 2 dcs in same st as beg ch 3, ch 1 and sl st in top of ch 3.  Fasten off, leave tail for weaving in.


Rnd 3: Attach White Yarn in ch-1 sp before ch 3. Ch 1 *ch 1, dc in middle 2 scs, ch 1, sc in ch-1 sp* repeat 5 times, ch 1, 2 dcs in middle 2 scs, ch 1, sl st in first sc. Fasten off leaving tail for weaving in.


Rnd 4:  With Red Yarn insert hook in sc you just fastened off, ch 3, dc in same st *ch 2, SHELL in next sc* repeat 5 times, ch 2, then do last 2 dcs in same st a beg ch 3, ch 1 and sl st in top of ch 3.  Fasten off, leave tail for weaving in.

Rnd 5:  Attach White Yarn in ch-1 sp before ch 3. Ch 1 *ch 1, dc in each dc, ch 1, sc in ch-1 sp* repeat 5 times, ch 1, dc in each dc, ch 1, sl st in first ch 1.  Fasten off leaving tail for weaving in.

Rnd 6 to 9:  Repeat Rnds 4 (alternating Red and Pink Yarns on Rnd 4) and 3,  2 times.


Rnd 10: With Pink Yarn insert hook in sc you just fastened off,  ch 3, dc in same st *ch 2, SHELL in next sc* repeat 4 times, ch 4 (counts as increase for thumb), SHELL in next sc, ch 2, then do last 2 dcs in same st a beg ch 3, ch 1 and sl st in top of ch 3.  Fasten off, leave tail for weaving in.

Rnd 11:  Attach White Yarn in ch-1 sp before ch 3. Ch 1 *ch 1, dc in each dc, ch 1, sc in ch-1 sp* repeat 4 times, ch 1, dc 2 times in each dc (increase for thumb), ch 1, sc in next ch-1 sp, dc in next 2 dcs, ch 1, sl st in first ch 1.  Fasten off leaving tail for weaving in.

Rnd 12: With Red Yarn insert hook in sc you just fastened off,  ch 3, dc in same st *ch 2, SHELL in next sc* repeat 4 times, ch 6 (counts as increase for thumb), SHELL in next sc, ch 2, then do last 2 dcs in same st a beg ch 3, ch 1 and sl st in top of ch 3.  Fasten off, leave tail for weaving in.

Rnd 13:  Attach White Yarn in ch-1 sp before ch 3. Ch 1 *ch 1, dc in each dc, ch 1, sc in ch-1 sp* repeat 4 times, ch 1, dc 2 times in first 2 dcs, sl st onto ch-6 chain, dc twice in last two dcs (increase for thumb), ch 1, sc in next ch-1 sp, dc in next 2 dcs, ch 1, sl st in first ch 1.  Fasten off leaving tail for weaving in.


Rnd 14:  Repeat Rnd 12 with Pink Yarn.  The ch-6 sp made on this row is the thumb hole.


Rnd 15:  Attach White Yarn in ch-1 sp before ch 3. Ch 1 *ch 1, dc in each dc, ch 1, sc in ch-1 sp* repeat 4 times, ch 1, sc 6 times in ch-6 sp, ch 1, sc in ch-1 sp, ch 1, dc in next 2 dcs, ch 1, sl st in beg ch 1.  Fasten off, leave tail for weaving in.

Rnd 16:  With Red Yarn insert hook in sc you just fastened off, ch 3, dc in same st *ch 2, SHELL in next sc* repeat 4 times, ch 2, SHELL in next sc in top of next SHELL, ch 2, then do last 2 dcs in same st a beg ch 3, ch 1 and sl st in top of ch 3.  Fasten off, leave tail for weaving in.

Rnd 17:  Attach White Yarn in ch-1 sp before ch 3. Ch 1 *ch 1, dc in middle 2 scs, ch 1, sc in ch-1 sp* repeat 4 times, ch 1, 4 scs in middle 4 scs, ch 1, sc in next SHELL, dc in next 2 dcs, ch l, sl st in first sc. Fasten off leaving tail for weaving in.


Rnd 18:  Attach Pink Yarn insert hook in sc you just fastened off,  ch 3, dc in same st *ch 2, SHELL in next sc* repeat 5 times, ch 2, then do last 2 dcs in same st a beg ch 3, ch 1 and sl st in top of ch 3.  Fasten off, leave tail for weaving in.

Rnd 19: Attach White Yarn in ch-1 sp before ch 3. Ch 1 *ch 1, dc in each dc, ch 1, sc in ch-1 sp* repeat 4 times, ch 1, dc in middle 2 scs, ch 1, sc in ch-1, ch 1, dc in next 2 dcs, ch 1, sl st in first ch 1.  Fasten off leaving tail for weaving in.

Rnd 20:  Attach Red Yarn insert hook in sc you just fastened off,  ch 3, dc in same st *ch 2, SHELL in next sc* repeat 5 times, ch 2, then do last 2 dcs in same st a beg ch 3, ch 1 and sl st in top of ch 3.  Fasten off, leave tail for weaving in.

Rnd 21: Attach White Yarn in ch-1 sp before ch 3. Ch 1 *ch 1, dc in each dc, ch 1, sc in ch-1 sp* repeat 5 times, ch 1, dc in last 2 dcs, ch 1, sl st in first ch 1.  Fasten off leaving tail for weaving in.

Before moving on to the next step weave in all the loose ends.

Thumb and Fingers

I recommend making the thumb because it will hold the glove in place on your hand, but the fingers are optional.

With Fingers

Without Fingers

Thumb
Rnd 1: Attach White Yarn to first of 8 dcs on thumb,  sc in same st and in each dc, 2 scs in side of pink dc, 6 scs in back of scs on ch-6 sp, 2 scs in next pink dc, sl st in first sc.


Attach in first dc

do 2 scs in side of pink dc (on each side)

do one sc in the opposite side of the 6 scs on the 6 ch

Rnd 2:  Ch 1, sc in same st and in next two scs, sc2tog, sc in next 3 scs, sc2tog, sc in next 7 scs, sc2tog, sl st in first sc.

Rnd 3:  Ch 1, sc in same st and in next two scs, sc2tog, sc in next 2 scs, sc2tog, sc in next 6 scs, sc2tog, sl st in first sc.

Rnd 4:  Ch 1, sc in same st and in next two scs, sc2tog, sc, sc2tog, sc in next 5 scs, sc2tog, sl st in first sc.

Rnd 5:  Ch 1, sc in same st and in each sc around, sl st in first sc.

Rnd 6:  Repeat Rnd 5, fasten off and weave in ends.


Fingers

Put on glove, mark with st markers in the spaces between you fingers.  *Attach White Yarn on one side, ch 2 and attach to opposite side, fasten off. Weave in ends.* Repeat 3 times.


You will be doing three rows of scs in rounds.  Attach the white yarn on the palm side of the glove, do two scs on the palm side, 2 scs in the side of the ch (or side of the glove depending on the finger), 2 scs on the back side of the glove and 2 scs on the side of the the other ch (or the side of the glove), then sl st into the first sc, ch 1 and sc in each st around two times then fasten off.  As you add fingers you will actually be stitching into the side of the previous finger.  Fasten off ends and weave in.

doing an sc in the side of a 2 ch


Finished Fingers


You May Also Like:

                                 
                                                    Heart Headband
Turbanesque Headband
Henna Tattoo Wedding Glove